• Skip to primary navigation
  • Skip to main content
  • Skip to primary sidebar

Naval Historical Society of Australia

Preserving Australia's Naval History

  • Events
  • Members Area
  • Volunteer
  • Donate
  • Contact us
  • Show Search
  • 0 items
Hide Search
Menu
  • Home
  • Research
    • Where to start
      • Research – We can help!
      • Self help
      • Naval Service Records
      • Library
    • Resources
      • Articles
      • On This Day
      • Podcasts
      • Videos
      • Related Maritime websites
      • Downloads
    • Other
      • Newsletters: Call The Hands
      • Occasional Papers
      • Books
      • A Cook’s Tour
      • HMAS Shropshire
      • Book reviews
    • Close
  • Naval Heritage Sites
    • World Heritage Listings
      • Cockatoo Island
    • National Heritage Listings
      • HMAS Sydney II and the HSK Kormoran Shipwreck Sites
      • HMVS Cerberus
    • Commonwealth Heritage Listings
      • Garden Island NSW
      • HMAS Watson
      • HMAS Penguin
      • Spectacle Island Explosives Complex NSW
      • Chowder Bay Naval Facilities
      • Beecroft Peninsula NSW
      • Admiralty House, Garden and Fortifications
      • HMAS Cerberus
      • Naval Offices QLD
      • Garden Island WA
      • Royal Australian Naval College ACT
      • Royal Australian Naval Transmitting Station ACT
    • Close
  • Tours
    • Sub Base Platypus Tour (North Sydney)
    • Dockyard Heritage Tour
    • Heritage Tour of Northern End of Garden Island
    • Tour Bookings
    • Close
  • About us
    • About Us
      • What we do
      • Our People
      • Office Bearers
      • Become a volunteer
      • Our Goals and Strategy
    • Organisation
      • Victoria Chapter
      • WA Chapter
      • ACT Chapter
    • Close
  • Membership
  • Shop
  • Become a volunteer
  • Donate
You are here: Home / Archives for Australian Navy / HMAS Melbourne I

HMAS Melbourne I

Occasional Paper 91: Invidious Choices – The German East Asia Squadron and the RAN in the Pacific, August to December 1914

October 6, 2020

By Lieutenant Commander Desmond Woods RAN

This paper was first published by the Australian Naval Institute online and in an abbreviated form the by the UK Naval Review and by US Naval Institute Proceedings. The Society is grateful to Lieutenant Commander Woods for making it available to the Naval Historical Society of Australia.

Lieutenant Commander Woods joined the Royal New Zealand Navy in 1974, subsequently serving in the Royal Navy, the British Army and the RAN as an Education Officer, teaching naval and military history to junior officers. From 2003-2010 he ran the Strategic Studies Course and Naval History induction at the RAN College before joining the staff of the Australian Command and Staff College. He was the Military Support Officer to the Defence Community Organisation in Canberra, worked on the RAN’s International Fleet Review in 2013, was the Staff Officer Centenary of Anzac (Navy) and Chief of Navy’s Research Officer. He is the Navy’s Bereavement Liaison Officer. LCDR Woods is a Councillor of the ANI and is a regular contributor of naval articles and book reviews to Australian and international naval historical journals.

On the morning of 4th November 1914 news reached the Admiralty in Whitehall of the disaster that had overtaken Rear Admiral Sir Christopher Cradock and his cruisers Good Hope and Monmouth at the Battle of Coronel off central Chile on the evening of 1 November.  Cradock and all 1660 men of his two outclassed, under gunned and obsolete cruisers had been destroyed – without inflicting any serious damage on Vice Admiral Maximilian’s von Spee’s armoured cruisers SMS Scharnhorst and Gniesenau and his cruiser escorts.  These were the ships of the German East Asia Squadron that had crossed the Pacific from their base in China, solved the problems of coaling and supply, and retained their capacity to strike at the Royal Navy’s South Atlantic Squadron with lethal force. Cradock made very clear before leaving Port Stanley to engage von Spee that he did not expect to survive such an encounter but would not attempt to evade it either. He told the Governor of the Falklands, Sir William Allardyce in his last meeting with him that he did not expect to see him again. He handed him a package with his medals and a farewell letter for an Admiral who was a former shipmate. He was well aware that his ships HMS Good Hope and Monmouth were inadequate for the battle he believed he was obliged to fight.

HMS Monmouth

At the Admiralty 4th November was the first day of Admiral Sir John ‘Jacky’ Fisher’s return after taking over from Prince Louis of Battenberg as First Sea Lord. Fisher had built Britain’s modern battle fleet in preparation for war at sea with Germany.  From retirement he had watched as his pre-war plans for using his fast, heavily armed battle cruisers to clear the trade routes of the world of commerce raiders had been ignored in favour of retaining these powerful ships in the North Sea awaiting the anticipated day of reckoning with the Kaiser’s High Seas Fleet.

As the scale of the defeat at Coronel and the loss of life became apparent Fisher demanded to know where his battle cruisers, ‘his greyhounds’, as he called them, had been when Cradock was sunk. Specifically, Fisher wanted to know why von Spee’s armoured and light cruisers had not met the fast powerful battle cruisers that he had built to, in his phrase, ‘Eat German cruisers as an armadillo eats ants.’ [i]

Winston Churchill as First Lord of the

The First Lord of the Admiralty, Winston Churchill, who had recalled the now elderly, but still mentally vigorous Fisher, to office, reacted to the news asking among many other questions how  swiftly the most powerful warship in the Pacific, the RAN’s battle cruiser, HMAS Australia would take to get to the Galapagos Islands.[ii] This request for information was ironic because it was the Admiralty which for weeks past had been preventing Admiral Sir George Patey, RN, the RAN’s fleet commander at sea in his flagship, from following his strategically sound instinct to pursue von Spee to South America in Australia.

On the 12th October Patey signalled the Admiralty proposing a route to South America for Australia via the Marquesas and Galapagos Islands to ensure that von Spee was not using either place as a coaling base. On the 14th the Admiralty replied to this request:

It is decided not to send Australian Fleet to South America. Without more definite information it is not desirable to proceed as far as the Marquesas Islands.[iii]

Throughout September and October, as von Spee made his way across the Pacific, Churchill had denied Cradock the powerful reinforcements for which he had asked.  Instead he sent him the slow and mechanically unreliable pre dreadnought battleship HMS Canopus. Churchill seriously overestimated her capability.  Because she carried four 12 inch guns Churchill post war continued to describe this reserve manned, elderly battleship as, ‘…the citadel around which all our cruisers could find absolute security.’ [iv]

Churchill had been a cavalry officer as a young man and had no personal naval experience. In 1914, despite his years at the Admiralty with professional seamen, he appears to have been inclined to believe that the calibre of a ship’s guns could be used to assess a ship’s total fighting power, regardless of all other factors including her age, her state of manning and general battle readiness.  Once Cradock was joined by Canopus he soon discovered that the slow old battleship inhibited rather than enhanced his ability to manoeuvre and fight in the South Atlantic.  That was why she was not with him when he faced von Spee’s modern ships at Coronel. That absence probably saved her from destruction.

Rear Admiral Sir Christopher Cradock

Had Fisher been deploying the RN’s worldwide fleet from the start of the war — rather than Churchill, Battenberg and the Chief of War Staff at the Admiralty, Vice Admiral Doveton Sturdee —  it seems at least possible, that Cradock would have had HMAS Australia as his ‘citadel’ ship when he took on the German armoured cruisers. Had Patey’s timely request to leave his base at Suva and pursue von Spee in his battlecruiser been granted, then the battle off the South American coast, when it  came, would not have been a one sided fight which Cradock could neither win nor avoid.

Australia had eight long range 12 inch guns with which to engage the 8.2 inch guns of the two German armoured cruisers. If von Spee had evaded Patey’s pursuit of him across the Pacific, and reached the coast of Chile, then Cradock’s two armoured cruisers, Good Hope, Monmouth and the light cruiser Glasgow could have been supplemented by the fast and powerful Australian battle cruiser. The Germans’ main armament would have been outranged, and Australia’s heavy, armour piercing, 12 inch shells would on the balance of probabilities, have disabled either or both Scharnhorst and Gneisenau. Whatever the outcome of such an engagement in the eastern Pacific, von Spee’s plan to re-supply in Valpariso, round Cape Horn and attack shipping routes in the South Atlantic as he fought his way home to Germany would have been defeated.

Counterfactuals, such as those presented above, are not history, and are necessarily speculative.  But it seems reasonable to assume that had Patey and his flagship been released from the central Pacific in good time to pursue von Spee, then the gallant Cradock and his sailors might have survived their battle and the Royal Navy would have avoided its first significant defeat in a sea battle since the war against the United States of 1812.

Battle of Coronel

Why that possible outcome did not happen, and tragedy and disaster ensued for the Royal Navy instead, is the subject of this paper. To provide an historical context for Coronel and the opening months of the war in the Pacific an examination of the pre-war strategic situation is necessary.

The new strategic calculus in the Far East and Pacific in 1913

In October 1913 the strategic calculus in the Pacific shifted dramatically in favour of British maritime interests when the Australian Fleet Unit, led by the new battle cruiser Australia, steamed into Sydney harbour. With the flagship were two Chatham class light cruisers: Sydney and Melbourne, built for the RAN; a third older cruiser, Encounter, on loan from the RN; and three new destroyers.  Rear Admiral Sir George Patey, RN, relieved Admiral Sir George King-Hall, RN, the last of the Royal Navy’s commanders of the Australian Station.  The Australian government had bought and, with the assistance of the parent navy manned, a formidable maritime deterrent. The persistent colonial fear that in wartime Australia would have its ports blockaded or bombarded, and its trade routes raided by the German East Asia Squadron was lessened but not eliminated. Australians rejoiced as they welcomed their new Navy and politicians basked in the reflected glory of this long awaited maritime muscle.  In May of 1914 the deterrent power of the guns of the new fleet was augmented by the modern E class submarines AE1 and AE2 with the capacity to attack German ships with torpedoes.

August 1914 in the Pacific

HMAS Australia leads the RAN’s First Fleet Unit into Sydney 1913

Nine months after the arrival of the Fleet, on the day war was declared, Australia steamed out of Sydney … ‘in all respects ready for battle.’  She would not return until 1919. Admiral Patey and the young RAN were ready for offensive or defensive operations in the Pacific, depending on what von Spee, and the Naval Staff in Berlin were planning for their East Asia Squadron.


SMS Scharnhorst Flagship of the German East Asia Squadron

In 1911 Berlin had reinforced German East Asia Squadron with two modern armoured cruisers, Scharnhorst and Gniesenau, and several fast light cruisers, and had given this prized command to the aristocrat Count Maximillian von Spee, a respected and seasoned commander and a man of undoubted personal courage and integrity.

Rear Admiral Count Maximillian Von Spee


Berlin’s Pacific war plan

The German Naval Staff’s war plan was to wage a cruiser war – against trade routes in the South China Sea, to the north of Australia, and in the Indian Ocean. German archives reveal that this was the strategic intention in the years before 1913 and the arrival of the RAN Fleet Unit in Sydney. Berlin’s planners took the view that food and raw materials from Australia and New Zealand were essential to Britain sustaining a long war and that attacking ships on sea lanes of the Empire therefore justified the inherent risks to the commerce raiders of meeting more powerful warships.  It was assumed in Whitehall that the German Squadron would operate from its naval base at Tsingtao in northern China. British naval war plans called for Vice Admiral Sir Martyn Jerram, C-in-C China Fleet, based at the British concession Wei Hei Wei, to attack Tsingtao as soon as hostilities were declared.

The RN’s China Fleet War Plan thwarted

Vice Admiral Sir Martyn Jerram C-in-C RN China Fleet

When the opportunity came Admiral Jerram was in position to execute the Admiralty’s pre-war plan with his powerful armoured cruiser HMS Minotaur, HMS Hampshire and two modern light cruisers.  On the point of carrying out his orders Churchill, supported by Sturdee, signalled Jerram giving him orders to sail south to Hong Kong to join the pre-dreadnought battleship HMS Triumph, which was unmanned and in dry dock. Jerram was furious and wrote to his wife:

All being ready I raised steam and was on the point of weighing anchor to proceed to a line to the south of Tsingtao, my recognised first rendezvous in the war orders submitted by me and approved by the Admiralty. To my horror, I then received a telegram from the Admiralty, dated 30 July to concentrate at Hong Kong, of all places, just over 900 miles from where I wanted to go. I was so upset that I nearly disobeyed the order entirely. I wish now I had done so. [v


The cost of not capturing SMS Emden at Tsingtao

This reversal of plans by the Admiralty was to have profound ramifications, and the rationale for it was never satisfactorily explained after the war by Churchill or his staff. There was no threat, real or imagined, to Hong Kong to justify Jerram being despatched there.  Had Jerram been permitted to attack Tsingtao on the declaration of war he would not have caught Scharnhorst and Gneisenau, which were far to the south east in the Caroline Islands, but he would have captured the fleet train and colliers in Tsingtao which instead survived to join von Spee at Pagan in the German Mariana islands in the Western Pacific. It was these ships that fuelled and supplied the German squadron’s odyssey across the Pacific to Chile and kept them battle ready.

Most significantly, Jerram would also in all likelihood have caught Emden and her collier Markomania and sunk or captured them. They were waiting outside Tsingtao for the RN cruisers to raid their port.   The destruction of Emden in August would have avoided the later loss of 20 allied merchant ships and their cargos that Emden’s captain Karl von Müller captured or sank in the Indian Ocean. His three months of commerce raiding stopped British shipping from sailing to and from Indian ports.  Emden’s destruction would also have prevented von Müller sinking a Russian cruiser, Zemchug, with heavy loss of life, and a French destroyer, Mousquet, at Penang, and the burning of the British oil storage depot in Madras.  With Emden stopped before she began her successful cruiser war, Jerram’s China Squadrom could have been available for the main event — the pursuit and bringing to battle of von Spee.  In this alternative scenario the Indian Ocean would have been free for the undelayed sailing of the ANZAC convoys through Suez and on to France and the Western Front, their anticipated destination in October 1914.

Instead the moment for a planned attack on Tsingtao was lost; Jerram was ordered south by the Admiralty and Karl von Müller, to his surprise and relief, found that his base was still open to enter, re-supply in, and leave without interference.  After coaling and storing he escorted the swiftly converted armed merchant raider Prinz Eitel Frederichand von Spee’s fleet train, including heavily laden colliers, out of Tsingtao, and joined his admiral now at Pagan. Jerram, languishing pointlessly at Hong Kong, had effectively been played out of the war in the Pacific by the Admiralty.

Franz Joseph, Prince von Hohenzollern, the Kaiser’s nephew, serving as Emden’s second torpedo officer, wrote in his memoirs of the surprise that he and his fellow officers felt at their freedom to enter and depart from Tsingtao in these last days of peace and the first days of war:

Only later did we learn that Admiral Jerram had intended to cruise outside Tsingtao and seize any of our ships he encountered. This had always been a possibility. What a rich prize the Royal Navy would have gained as the greater part of our colliers and supply-ships lay in Tsingtao. Happily we had an involuntary ally in Winston Churchill who ordered the British Squadron to assemble in Hong Kong. This bought us time we could not otherwise have enjoyed. [vi]

Patey’s ‘raid’ on Rabaul – 11 August 1914

Von Spee’s signals to his cruisers were heard but were not able to be decoded for their meaning by naval intelligence staff led by Captain Hugh Thring in Navy Office in Melbourne. The code breaker Dr Wheatley could not give Patey the German Squadron’s exact location, but he was told that the signals appeared to be strengthening daily.  Navy Office deduced that von Spee was steering south east, and made the reasonable assumption that the squadron could be heading for Rabaul, the main port in German New Guinea.

As a consequence of receiving this intelligence Patey steamed the RAN fleet unit, which included the ill-fated submarine AE1, to Simpsonhafen.  He mounted an operation on 11 August to surprise the Germans ships he hoped were there with a night torpedo attack using his three destroyers.  Sydney was waiting as their support ship.  The blackened destroyers cleared for action and slipped into the anchorage and found nothing. The signal strength intelligence was misleading; the harbour was empty.  Von Spee was at still at Pagan, 3000 kilometres to the north, where his fleet was monitoring signals from the German WT station near Rabaul at Bita Paka.

He learned from these signals the unpalatable fact that just six days after the war had been declared the RAN had made a raid on a German port, 3000 km from its base in Sydney.  Von Spee now confirmed what he had already appreciated, that there was to be no safe German base for his ships in the South West Pacific.  He fully understood that he was opposed by a powerful well balanced Australian task force, capable of swift deployment and which was actively hunting his ships.  It must have been a bitter moment for him. On 18 August he acknowledged this reality explicitly when he wrote that the arrival of an RAN battle cruiser in 1913 had made any pre-war plans in Berlin for the squadron operating as commerce raiders on trade routes in the South West Pacific overly ambitious and positively dangerous.  His understatement written to his wife read:

The Anglo Australian Squadron has as its flagship Australia, which by itself, is an adversary so much stronger than our squadron that one is bound to avoid it. [vii]

Invidious options for von Spee

On 25 August Von Spee learned that the Japan had declared war on Germany.  The powerful Japanese fleet now made the North West Pacific hostile for him. Tsingtao was about to be under siege from Japanese troops and was no longer an option for basing or for resupply. There remained only one realistic course open, he had to cross the Pacific, round Cape Horn and attempt to make his way home against whatever the RAN and the RN could place in his path. He knew it was a dangerous, probably impossible, option, and a logistical nightmare, but it was all he had left to offer his men and his Kaiser. As long as he could stay afloat and keep moving he was effectively a ‘fleet in being’ and could divert RN and RAN ships that were needed elsewhere. That was a role that was worth adopting. But Emden’s Karl von Muller sought and received von Spee’s blessing to undertake cruiser warfare, to slip covertly into the Indian Ocean and to operate as a commerce raider in accordance with German naval staff plans.

Changing Pacific priorities 1913 -14

The Admiralty’s pre-war plan for the Pacific formed part of its world-wide commerce protection effort. Consequently both Admirals Jerram and Patey believed that their first priority was to find and destroy enemy commerce raiding cruisers. But once the war started competing British and Australian government priorities emerged. These included the seizure of German Pacific territories and the silencing of their wireless telegraphy stations by which the naval staff in Berlin could stay in touch with their deployed cruisers.

Churchill and Sturdee therefore changed their priority to the elimination of the WT stations and the seizure of the German colonies across the Pacific. The stated aim was to sever German communications which could aid German warships; the unstated intention was to use the territories as bargaining chips when the war ended. The Australian government was also keen to forestall the possible Japanese seizure of German colonies on Australia’s doorstep, particularly in New Guinea.[viii]

The Samoan Operation – Taking the Kaiser’s Colony

In the event of war the New Zealand Government had volunteered to occupy German Samoa with its troops and take over the WT station in Apia. It was now asked to do so by the Secretary of State for War, Kitchener. Seizing Samoa was deemed by the War Office in London to be:  a great and urgent Imperial Service.[ix] The Commonwealth Naval Board was surprised by this request and the Minister of Defence, Senator Millen, accepted in principle provided this did not divert the RAN from the primary task of finding and defeating von Spee’s squadron.  He replied to the request saying ‘… it is manifestly undesirable to divert any of the RAN’s warships from their present mission,’[x] and suggesting that the occupation of Samoa could be done with an escort of an armed merchant ship. This was unlikely to be approved in London or Wellington given the risk that such an unprotected vessel might run into any of von Spee’s ships with disastrous consequences for 1385 New Zealanders. In response to his cable Millen received an unequivocal reminder and hastener from London which read: ‘ …. military authorities hope to hear shortly of Australian activity dealing with German possessions in the Pacific Ocean.’

Patey had no choice but to agree to guard the troopships, and assembled at Noumea a powerful escort consisting of his flagship and Melbourne, and the French armoured cruiser Montcalm.  He believed the threat to the New Zealand troop convoy from von Spee was real and he also reasoned that if the German squadron was heading for Samoa, to defend the Kaiser’s colony, it could be brought to battle there.  On the basis of the knowledge then available it is hard to fault the proposition that the Samoan expedition was the best chance of achieving a favourable encounter with the German ships.  It was a reasonable and prudent assumption and in fact only a few weeks premature. Von Spee would head to Samoa in early September once he learned that it had been seized, but by then Patey had been ordered back to Rabaul.

Admiral Sir George Patey, RN

On route to Samoa Patey learnt that the Japanese had entered the war and he was more than ever convinced that von Spee, (who had learned of it by a signal from the German embassy in Tokyo), had no choice but to head for South America where re- supply was guaranteed in nominally neutral, but de facto pro German, Chile.  Patey reasoned, rationally, that Von Spee’s way into the Indian Ocean was blocked by Jerram’s fleet and he would have no chance of getting coal supplies there. It could be a logistical trap from which his fuel-hungry coal fired armoured cruisers could not escape. Therefore he had no choice but to keep heading east.

The German Governor of Samoa refused to formally surrender to the New Zealand troops, but wisely offered no resistance to the force that landed on 29 August.  Had Patey been permitted to stay at Apia, as he wished, to await von Spee, a battle would have been almost inevitable.  But once the Samoan expedition had succeeded the Admiralty reinstated the delayed expedition to be mounted to capture the Bita Paka WT station near Rabaul and to occupy German New Guinea. When first asked his opinion of the New Guinea operation Patey told the Australian Naval Board that: ‘…..wireless stations will have to wait for now.’  After the war Patey, wrote that his intention in going to Samoa was not only to cover the troop convoy but in the hope that:

I might have the opportunity of bringing Admiral von Spee to action, as I felt sure he would be in the vicinity, and I thought that once I had got so far east I might be left free to deal with the German Squadron in my own way. [xi]

Patey’s expectation that he would be given freedom of action as the local flag officer to continue the chase towards South America was overly optimistic.  The naval world encompassing the wireless telegraphy revolution, combined with older underseas cable links, meant that Patey, like all other RN flag officers at sea, could receive orders from Whitehall in a maximum of forty eight hours.  Consequently admirals became merely the executors of Admiralty orders. The era of independent strategic command was over.  The Admiralty became the de facto operational commander and the Australian Naval Board, which could have been more assertive and was closer to the scene, concurred in the decisions made in Whitehall. This was in accordance with the pre 1914 agreement that RAN ships would be commanded operationally from Whitehall in wartime.

Unfortunately during the early months of the Admiralty War Room’s operations its limited and inexperienced staff discovered that it was much easier to assume command of world-wide naval operations, using modern communications, than to actually try and conduct such operations from afar.

The Australian Naval and Military Force – the Battle of Bita Paka

The reinstated original Admiralty order of 6 August now required Patey to escort the Australian Naval and Military Expeditionary Force (ANMEF) to Simpsonhafen, the port of Rabaul. It spoke of the removal of the WT station, but also tellingly re-stated that:

All German colonial territories taken would at the conclusion of the war be at the disposal of the Imperial Government for purposes of an ultimate settlement at conclusion of the war.  [xii]

Churchill also spoke on other occasions of the German colonies as:  ‘…. diplomatic hostages for the liberation of Belgium.’  Maritime strategy in the Pacific was being made subservient to theoretical peace negotiations and possible post-war diplomacy.  The admittedly difficult task of locating von Spee, which should have remained an urgent necessity, was now deferred in favour of the capture of another German wireless station at Bita Paka whose usefulness to von Spee was at an end as he proceeded ever further to the east across the Pacific and beyond its range. [xiii]

The German Squadron ‘raids’ Apia in Samoa

Von Spee, having heard of the New Zealand army seizure of German Samoa, diverted from his easterly course across the Pacific, left his fleet train and sailed his warships south to the now occupied colony. He arrived on 14 September hoping to surprise Patey.  But Patey had left Apia on 31 August and Australia and the RAN cruisers were back in Simpsonhafen, off Rabaul, supporting the operation to take the Bita Paka wireless telegraphy station.  Had Patey’s wish for HMAS Australia to remain at Apia been granted by the Admiralty,  we might now be discussing the Battle of Samoa, not the Battle of the Falklands, as being the decisive engagement fought by the German East Asia Squadron in 1914.

HMAS Australia carried eight 12 inch guns

Certainly von Spee and his men were keen to fight the Australians. They cleared for action before dawn and entered Apia Harbour at speed to mount a surprise attack on whatever allied warships might be there. They hoped to find an anchored RAN battle cruiser.  Instead, like Patey at Rabaul in August, they found the harbour frustratingly empty. Captain Pochhamer, the First Officer of the Gneisenau writing in his memoirs made much of the general disappointment in the squadron that Australia was gone when the Germans arrived.  However he also wrote more realistically that Australia’s 12 inch guns: inspired a certain respect. [xiv]

Scharnhorst’s 8.2 inch guns – no match in range or weight for Australia’s

If Australia had been at Apia, and if the Germans had achieved surprise at close range with their excellent gunnery an RAN victory is not certain.  However, the probability is that the duty patrolling cruiser and, in daylight hours, the New Zealand lookouts at the WT station, would have provided Patey with the warning he needed to weigh anchor and proceed into battle at an advantageous range of his choosing.  Had that occurred the 8.2 inch guns of Scharnhorst and Gneisenau would have been out-ranged.

Under these circumstances the likelihood is that von Spee would have lost ships. Even if he had escaped outright destruction his ammunition supply for his main armament would have been too diminished to allow him to engage in battle again. His chance of getting back to his fleet train for resupply would have been very low. In practice, any encounter with the RAN Squadron off Samoa would have stopped von Spee’s progress across the Pacific towards Valpariso, Cape Horn and the Atlantic.

It was not to be. Once in Apia harbour von Spee sensibly made no attempt to re take the German colony or to shell its wireless telegraphy station, now being operated by New Zealand army signallers.  He knew his gunners were going to need every one of their irreplaceable 8.2 inch shells when battle was eventually joined, as he knew it must be one day.  The Australian Naval Board, the Admiralty and Patey now knew precisely where the German Squadron was, but their priority was now safe transit of troops to war, not a naval battle.

Emden calls the shots

On 19 September the Admiralty first learned that von Müller and his elusive cruiser Emden was regularly sinking British ships in the Indian Ocean and sending their crews and passengers to India. Battenberg up to this point had made his priority finding the German East Asia Squadron and bringing it to battle.  But this menace at large in the Indian Ocean complicated the situation, and the pursuit of the von Spee became of secondary importance. Churchill’s focus shifted to getting Australian and New Zealand troops to the Western Front. The First Lord of the Admiralty personally took charge of the Royal Naval Division’s defence of the port of Antwerp and was not thinking about the Pacific. Meanwhile, the First Sea Lord, Prince Louis of Battenberg, was under daily attack in the press for his German ancestry.

The Admiralty’s attention, and that of the British cabinet and Australian and New Zealand Governments, shifted to the pursuit of Emden which imperilled this strategic objective.

The urgent priority was now to assemble a powerful escort to get the NZEF and AIF Divisions from Wellington to Albany in Western Australia, and then to Egypt and swiftly into the trenches in France to reinforce the British Expeditionary Force.

Understandably, the Australian and New Zealand Governments had no intention of sailing their troops across an ocean known to contain a German raider without a powerful covering force to guard them from a potentially catastrophic attack.  Delay inevitably ensued. Churchill, on his return from Belgium, now overrode Battenberg’s objections to this shift of priority away from von Spee to von Müller. The First Sea Lord was forced to concur with Churchill’s view that getting the troops to the Mediterranean was so important that nothing except the certain prospect of fighting enemy ships should delay it.

At the insistence of the New Zealand Government, supported by the Australian Governor General, Sir Ronald Munro Fergusson, Jerram’s flagship the armoured cruiser Minotaur and the Japanese armoured cruiser Ibuki were sent to Wellington to escort the New Zealand troop transports across the Tasman and the Great Australian Bight to Albany.

Japanese sailors from armoured cruiser HMIJNS Ibuki in Wellington Harbour with HMS Minotaur

To achieve this result Patey was stripped of Sydney and Melbourne which, with Minotaur and Ibuki, made up the powerful convoy escort that finally sailed on 1 November from Albany after being delayed since mid September by Emden’s depredations on the British merchant fleet in the Indian Ocean.

HMAS Sydney escorts the First AIF and NZEF Convoy out of Albany

Australia was also briefly ordered to escort the troop convoy, and proceeded south on 15 September, only for the orders to be cancelled two days later.

When news of the disaster at Coronel on 1 November reached Fisher in London he detached Minotaur from her duties escorting the convoy and sent her to Capetown at her best speed.  Fisher reasoned that it was not impossible that von Spee might continue round the Horn, cross the South Atlantic heading for the German colony of South West Africa and seek refuge in the deep water harbour at Walvis Bay. Based there he could attack the multitude of British ships using the Cape route from India and Australia and New Zealand to Britain.  It would be an audacious, but not impossible plan which had to be countered by a sensible defensive strategy.

Emden’s strategic achievement in the Indian Ocean

Von Spee had released Emden at von Müller’s request to engage in cruiser war in the Indian Ocean. Tactically he performed brilliantly, but strategically he did far more. He threatened all British trade in the Indian Ocean and diverted all available allied warships from their alternative task of pursuing the German East Asia Squadron.

German light cruisers were commerce raiders not designed to stand in the battle line

Von Spee knew he commanded a ‘fleet in being’.  He was at liberty with the only German naval task force outside Europe still able to inflict a significant defeat on the Royal Navy, if luck and circumstances favoured him. Emden’s cruise was a distraction from this obvious but unresolved fact. Emden’s task was to tie down warships in the Indian Ocean which would otherwise have been concentrating on bringing the German Squadron to battle.

German postcard showing Emden in Penang harbour

On 30 October, when Emden entered Penang harbour by night and torpedoed and sank the Russian cruiser Zemchugand the French destroyer Mousquet, von Müller was fighting precisely as von Spee needed him to be. This was textbook cruiser warfare and spread alarm across the whole of the Indian Ocean. By late October British ships were not sailing from Indiana ports. Commerce was paralysed by the clear and present danger to maritime trade and the sky-high insurance rates for ships operating where Emden might sink them

Nine days after the heavily escorted Anzac Troop Convoy finally sailed from Albany, Emden’s nemesis overtook her in the shape of the convoy escort, Sydney, at the Battle of Cocos.

HMAS Sydney at the Battle of Cocos

By then von Müller’s job of holding the world’s attention while von Spee proceeded unhindered across the Pacific was accomplished.  He had served his Admiral well and demonstrated with his single light cruiser just how severe the disruption to the Empire’s trade routes could be in a period of six weeks.

If, in August, von Spee had chosen to ignore the coal supply problems which worried him, and taken Scharnhorst and Gneisenau, and his three light cruiser escorts into the Indian Ocean as commerce raiders, before heading for the Cape of Good Hope, the disruption he would have caused would have been serious and lasted longer. He may have been wise logistically not to go west, but it was surely a finely balanced decision. Had he chosen the bolder course of commerce raiding with his entire Squadron and successfully captured the coal he needed, then he had the number of ships and the firepower to have struck a serious blow to the supply lines of the Empire in the opening months of the war.

The threat from Emden to the troops who left Albany and that were to become the Anzacs, was real. We know this to be true because after Emden was wrecked by Sydney’s shell fire and driven aground, von Müller was captured and spoke of how he saw his duties.  He was asked by Sydney’s Captain John Glossop, over a shared dinner in his cabin, what he would have done if he had known of the convoy of thirty seven troop ships passing within fifty miles of the Cocos Islands the day he raided the wireless telegraphy station on Direction Island. Von Müller replied that, ‘Emdenwould have shadowed the convoy in darkness and at first light attacked the troop transports with guns and torpedoes until out of ammunition or we were sunk by the escorts, whichever came first.’

Under that entirely possible scenario it seems highly likely that one of more troopships would have been sunk by Emden.  Australians and New Zealanders would have died, in perhaps large numbers, without ever seeing Egypt, far less the beaches of Gallipoli.  The negative effect on public opinion in the Dominions would have been severe indeed.

SMS Emden firing on HMAS Sydney early in the battle of Cocos

Von Spee’s Pacific progress to South America

While von Müller was attracting a massive allied hunt for a single ship in the Indian Ocean von Spee was solving immense logistical difficulties in getting to South America. His German warships were not designed for steaming over such long distances with so many mouths to feed and coal holds to fill. Coal consumption was the over-riding concern and dictated a slow speed. Re-supply was brought to the squadron by neutral American colliers coming from Hawaii. Fresh food and water were also limited.

After being frustrated at Samoa, by Australia’s absence, von Spee visited Bora Bora in the Society Islands. He flew no flags, and greeted the French Chief of Police in English.  Gullible French colonists resupplied him with pigs and fruit and bread before an observant and literate native in a canoe pointed out the word Scharnhorst painted over on his stern.  France apparently did not send her more observant policemen to the central Pacific.  Von Spee paid the helpful French, thanked them for their assistance and sailed on to Tahiti intending to seize the coal stocks he needed.  A junior French naval officer, who knew from Samoa’s wireless warning that von Spee was coming, set fire to the island’s coal supplies.  Von Spee, silenced the disembarked gun battery from the sloop Zelee that bravely fired on him. He then bombarded Papeete’s marketplace briefly, causing no casualties, before sailing away without French coal and frustrated.[xv]

An elementary ‘Ruse of War’ and its strategic consequences

HMS Defence – modern armoured cruiser

Knowing he was being observed, and that his position and course would be reported, von Spee sailed north west from Tahiti over the horizon before resuming his easterly course towards Chile.  This elementary mariner’s ‘ruse of war’ was later reported to the Admiralty who fell for this trick and concluded, without any corroborating evidence, that von Spee might be heading back into the western Pacific.  As a result of this elementary deception Cradock in his old cruisers at the Falklands would wait in vain for the more powerful armoured cruiser HMS Defence, which he believed to have been sent to reinforce him from the Mediterranean. Defence had started her voyage but was stopped at Malta because it was now believed in the Admiralty that von Spee was probably not heading for Cape Horn and the South Atlantic.

HMS Canopus – pre Dreadnought battleship

The Admiralty did not inform Cradock of this change of plan or the flawed assumptions on which it was based. By the time this ruse had been detected and Defence finally left the Mediterranean it was too late for her to get to the Falklands to join Cradock before he sailed into the Pacific with Canopus.

In October, on Admiralty orders, Patey in Australia was at Fiji conducting pointless patrols, searching for the supposed return of the German ships to the western Pacific south of the Equator. Simultaneously, the Japanese Navy was searching for them  north of it.  Meanwhile, through October, von Spee continued his slow progress via Easter Island – where he was willingly re-supplied by a British cattle farm manager who had not heard that a war had started – and on to Juan Fernandez. There he fuelled from colliers escorted to him from San Francisco by the light cruiser Leipzig.  Now refuelled it was only a short voyage to the ports of Chile and the snow-capped Andes. But before his welcome from the German community in Valpariso would come his crushing defeat of Cradock at Coronel.

HMAS Australia and Patey – a dog tethered to its kennel

While von Spee’s laborious trans-Pacific progress was occurring, Patey continued to patrol off Fiji, and it would not be until 8 November, a week after Coronel had been fought and lost, and Fisher was back at the helm in Whitehall, that the Admiralty finally ordered Australia, with her fast collier, to sail to the Galapagos to be ready to block von Spee’s progress if he turned north.

By then, for nearly two months Patey had been in a state of impotence described by Arthur Jose, the Official Australian War historian, as being: ‘like a dog tethered to his kennel. He made darts into neighbouring waters and was pulled back before any results could be obtained.’[xvi]

Hindsight is a wonderful asset, and it is easy to be wise about what should have been done with its assistance. But two contemporary naval strategists who were in the midst of these events and who deplored what they saw cannot be lightly dismissed.  Admiral Jerram, observing events, lamented what he called: ‘……blundering about in the Pacific achieving nothing.’ He wrote to his wife:

The Australian Squadron, were within about 1200 miles of the German cruisers and by Admiralty order footling about with expeditions to New Guinea and Samoa, operations which could not possibly have any effect on the outcome of the war and which might have been undertaken at any slack time later on. Absolutely contrary to all principles of naval warfare, as in the first place, they were extremely dangerous due to the near presence of a powerful cruiser force and, in the second, they gave time for the enemy to collect coal stores  etc. [xvii]

Captain Hugh Thring, who had prepared the RAN for war, and was  the most experienced Pacific planner and maritime strategist in Australia, called the Samoan Expedition: ‘…..futile and a waste of precious weeks.’  Thring in Melbourne provided the Admiralty with the decrypted information which continually indicated that Von Spee was moving eastward and was not returning to the South Pacific. The Admiralty used the highly successful decoding skills of Thring’s German speaking linguist Dr Frederick Wheatley but refused to trust the evidence that von Spee was heading for Chile he was producing for them.

What might have been had HMAS Australia joined Cradock before Coronel

There are clear alternative possibilities for HMAS Australia’s movements which were being urged by Patey. Were they feasible? If released at the beginning of September, Australia, perhaps accompanied by either Sydney or Melbourne,might have joined Cradock at the Falklands. The RAN ships could have taken the southerly great circle route into high latitudes round the Horn to minimise the distance into the South Atlantic.  Patey kept with him at all times a fast collier, the SS Mallina and supply ships to accompany Australia into the South Atlantic. He and his officers were waiting to be sent east and hoping to bring von Spee to battle before, as they imagined, a powerful RN hunting squadron in the South Atlantic forestalled them.

Alternatively Australia could have travelled a shorter distance and been directed by the Admiralty to meet Cradock’s ships off Chile and together the reinforced squadron would have waited for von Spee’s inevitable arrival in the waters off Valpariso.

It was not to be. Like Jerram, sent pointlessly to Hong Kong in August when he wanted to be dealing with Emden and von Spee’s fleet train in Tsingtao, Patey had been played out of the game by the Admiralty. The last opportunity to bring von Spee to battle in the Pacific on advantageous terms had been frittered away. Consequently, the understrength and outclassed Royal Navy South Atlantic Squadron were defeated at sea at Coronel.  Two cruisers were sunk, sixteen hundred British sailors were dead.  The British public was appalled and enraged and the newspapers were demanding accountability and swift revenge.

Admiral Sir John (Jacky) Fisher

Fisher now took charge and ordered Jellicoe, commanding the Grand Fleet to detach Australia’s two half sisters, Invincible and Inflexible, from the battle cruiser squadron at Rosyth, Fisher placed them under the command of Admiral Doveton Sturdee, (whom he wanted out of the Admiralty for personal reasons), to steam south and take their revenge on von Spee. Churchill had to be convinced that two battlecruisers were needed to take on Scharnhorst and Gneisenau. He was concerned about weakening the Battle Cruiser force in the North Sea.

On Fisher’s orders the new battle cruiser Princess Royal was sent to the Caribbean in case von Spee had plans to use the Panama Canal to return to the Atlantic.

Simultaneously Fisher ordered Patey to take Australia at her best speed and to block the Pacific entrance to the canal in case von Spee had plans to go north from Chile and use the canal to return to Europe. With the old Sea Lord back in charge serious strategic thought was being given to all logical possibilities open to von Spee in the Pacific. Fisher’s doctrine had always been: ‘destroy opposition wherever it presents itself with overwhelming force.’

HMS Inflexible and HMS Invincible steam south in November 1914

None of this belated activity could undo the damage done by weeks of dithering and lack of attention to what von Spee was most likely to be doing. This failure by the Admiralty to make good use of time was noted by one keen observer based in Australia, the Governor General of Australia and Commander in Chief, Sir Ronald Munro Fergusson


The climax of the ‘long bungle in the Pacific’ 

Sir Ronald Munro Fergusson – Governor General of Australia

On the 15 November having learned of the scale of the defeat at Coronel, Fergusson wrote to the British Government in trenchant terms outlining Australian views on what he called ‘the long bungle in the Pacific’.  He spelt out very clearly the scale of the lost opportunity to use the RAN for the purpose for which it had been built. He wrote:

While reluctant to concern myself with naval strategy I have to report a prevailing opinion that the loss of our cruisers off the Chilean coast is the climax of a long bungle in the Pacific. The maxim of seeking out the enemy’s ships and destroying them has been ignored. Nearly a month was wasted over Samoa; after the wireless station at Simsonhafen has been destroyed the Australia was detained for many days at the Bismarck Archipelago; lastly valuable time was lost cruising around Fiji. Had Admiral Patey immediately destroyed the German wireless station and then sought out the enemy’s ships, these would not have been left unmolested for three months nor, in all probability would our military expedition to Europe have been so seriously delayed.

Admiral Patey at our interview in Sydney on August 2nd was insistent on the need for an immediate and unremitting chase of the Scharnhorst and Gneisenau, and I know that he never swerved from that view. There is but one opinion here, viz., that HMA Fleet, and the China Squadron also, has been singularly ineffective; and that to the remoteness of Admiralty control may be traced the concentration of German ships off Chile with its lamentable results. [xviii]

Jose quotes an unnamed post war German naval historian who saw the situation in a similar way. He criticised the Admiralty’s strategy as being disjointed and unduly hampered by the expeditions to Samoa and New Guinea before concerted measures were taken to find and fight the German Squadron. Tellingly this German historian is quoted by Jose as writing…. ‘the mere sending of the Australia to the west coast of South America might have averted the disaster for the British at Coronel.’ [xix]

Disaster averted at Port Stanley

HMS Canopus opens fire on the German fleet off Port Stanley

Inflexible and Invincible arrived at the Falklands only one day before von Spee did so. Both ships were coaling with their hatches open and not ready for battle. Had von Spee closed the range and opened fire on them he might have achieved strategic surprise.  What saved the situation was the elderly Canopus which had been beached as a guardship on Fisher’s orders to protect the entrance to Port Stanley. Her 12 inch guns were fired remotely from the shore and though no hits were scored they came close to Gneisenau and deterred von Spee from attempting his plan to take the Falklands, burn its coal stocks, and capture its Governor. He had seen the masts of the two British battle cruisers in the port and decided to try to outrun them. It was a fatal mistake. Inflexible and Invincible with their cruisers had all day in which to leave the port, overhaul the Germans and eventually destroy them. They did this with the same type of 12 inch guns that HMAS Australia carried.

Coronel and the Falklands
HMS Carnarvon witnesses the end of SMS Scharnhorst

HMAS Australia after Coronel – the nearest point of contact

After the Battle of the Falklands and the destruction of the German Squadron by Inflexible and Invincible, Australiawas ordered to sail to the United Kingdom via Cape Horn as the Panama Canal was temporarily closed.  Over the location of the Battle of Coronel the flagship stopped and a funeral service was held for Cradock and his RN sailors who lay below on the seabed with their ships.

Later that month, after rounding Cape Horn, as the flagship steamed through the waters off the Falklands where Fisher’s other two ‘greyhounds’ had avenged Cradock, Australia stopped to pick up a souvenir of the battle spotted by the officer of the watch.  It was a life buoy with the word Scharnhorst on it. It was taken to Patey to examine.  That life buoy was the closest that Fisher’s antipodean ‘greyhound’, HMAS Australia, got to the enemy that she had been designed and bought to counter in the Pacific and bring to battle.  Admiral Patey and his ship’s company must have been above the wrecks of the East Asia Squadron’s ships containing the bodies of Vice Admiral Maximillian von Spee, his two sons, and nearly 2200 German sailors.  These men had joined Rear Admiral Christopher Cradock and his 1660 Royal Navy sailors on the sea bed of the Southern Ocean.

Conclusion and unanswerable questions

Could it have all been different? Could Australia and the very able Sir George Patey have found and engaged Scharnhorst and Gneisenau if he had been given the tactical autonomy he asked for?  If he had remained at Samoa when he asked to do so would there be an engagement known as the Battle of Apia?   Could a better strategic understanding of the Pacific, a realistic appreciation in the Admiralty and careful following of the intelligence have given Australia the only chance she would ever have to engage an enemy battle squadron?  Would she have prevailed in battle against the two German armoured cruisers?  Had Australia been with Cradock off Chile would he and his 1654 men in their underarmed ships Good Hope and Monmouth have survived the battle?

Questions about why Australia was not employed for the purpose for which she was built were asked at the time and have been asked for a century, and we are no closer to knowing the answer and nor will we ever be. The answers are unknowable, lost to us like the brave men on both sides who fought the war at sea in the southern oceans in 1914 and paid with their lives for their dedication to doing their duty as professional naval officers and sailors.

Cradock Von Spee and Sturdee

END NOTES

  1. Fisher quote. In regard to cruisers, no number of smaller type of cruisers can cope with even one thoroughly powerful first-class armoured cruiser. An infinite number of ants would not be equal to one armadillo! The armadillo would eat them up one after the other. http://dreadnoughtproject.org/tfs/index.php/
  2. Pitt, Barrie, Coronel and the Falklands p 43
  3. Jose, A.W, Official History of Australia in the War of 1914-1918 p 123
  4. Churchill, Winston. The World Crisis,. Odhams Press, London 1938 p. 370
  5. Jerram Private papers, letter to wife Clara, Nov 1914, GB 00064, quoted in Carlton. M, First Victory 1914 p 83.
  6. Hohenzollern-Emden, Prince Franz Joseph, Emden: The Last Cruise of the Chivalrous Raider, 1914 p 32.
  7. Jose, A.W, p 31.
  8. The Australian view of the Anglo Japanese alliance was very different from that of the Imperial government.Before the Battle of Tsushima Australians viewed Japan with suspicion. After that 1905 victory many Australians viewed the Japanese navy with alarm.
  9. Jose, A.W, p 47 Cable from British Government Committee of Imperial to the Commonwealth Government 6 August.
  10. Ibid p. 49
  11. Carton, M, First Victory p.94.
  12. Jose, A.W p 47. In the early weeks of the war a negotiated conclusion to the hostilities was anticipated in London and the future of Germany’s overseas colonies was seen by HMG as a part of the negotiations for a European settlement.
  13. Bita Paka WT station was duly taken on 11 September with the loss of one RN officer, five Australian sailors, an Australian Army doctor, one German regular and approximately thirty native German irregular police
  14. Pochhammer, Kapitan zur See Hans, Before Jutland: Admiral von Spee’s Last Voyage, p 212.
  15. The French navy court martialled the officer in Toulon for losing his gun boat before later decorating him posthumously for his bravery.
  16. Jose, A,W. p 123
  17. Jerram: Private Papers, GB 0064 JRM quoted in Carlton p 171
  18. Jose, A.W p 110.
  19. Ibid p 47.


BIBLIOGRAPHY


Bean, C. E.W. Official History of Australia in the War of 1914-18 University of Queensland, 1921 Vol IX: The Royal Australian Navy 1914-1918 and Vol X; The Australians at Rabaul

Carlton, Mike.  First Victory 1914- HMAS Sydney’s Hunt for The German Raider Emden, William Heineman, Australia, 2013

Churchill, Winston. The World Crisis, 1911 -1918. Odhams Press, London, 1938

Corbett, Sir Julian, Naval Operations, Vol 1, Longmans, Green & Co. London, 1920.

Gilbert, Gregory. Steaming to War:  HMAS Australia (I) in August 1914 – AWM Wartime Magazine 2014.

Massie, Robert K.  Castles of Steel Britain Germany and the winning of the Great War at Sea, Random House, 2003

Mackay, Ruddock F. Fisher of Kilverstone. London: Clarendon Press. 1973.

Overlack, Peter. The Commander in crisis. Graf Spee and the German East Asian Cruiser Squadron in 1914’, in J. Reeve & D. Stevens (Eds) The Face of Naval Battle. The human experience of modern war at sea. Sydney, Allen & Unwin, 2003.

Pitt, Barrie, Coronel and the Falklands, Cassell & Co, 1960.

Pochhammer, Kapitan zur See Hans, Before Jutland: Admiral von Spee’s Last Voyage, Jarrolds, London, 1931.

Hough, Richard, The pursuit of Admiral van Spee, George Allen & Unwin, London, 1969.

Hohenzollern-Emden, Prince Franz Joseph, Emden: The Last Cruise of the Chivalrous Raider, 1914, Lyon Publishing International, London 1989.

Jose, A.W,  Official History of Australia in the War of 1914-1918.

Stevens D and Reeve J, Southern Trident. Strategy, History and the Rise of Australian Naval Power Sydney Allen and Unwin, 2001.

Stevens, D, In All Respects Ready – The RAN in World War 1, Oxford 2014.

Stevens, D, From Offspring to Independence, in Dreadnought to Daring.  Seaforth 2012.


HMAS Melbourne in WWI – a Diarist’s Perspective

June 22, 2016

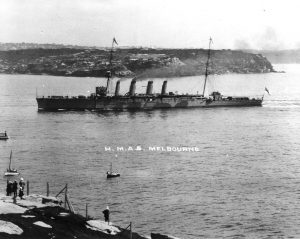
By Kingsley Perry

 George Henry Iles was born at Norwood, Surrey on 11 December 1883 and later joined the Royal Navy where he became a cook. On 14 October 1912 he was amongst a large number of RN personnel lent to the RAN, helping crew its new ships fitting out in British yards. On the day she commissioned, 18 January 1913, he was formally posted as a Leading Cooks Mate to HMAS Melbourne and later promoted to Acting Chief Ships Cook and finally to Chief Petty Officer Cook. He served in Melbourne throughout the Great War until 23 May 1919. Following a brief stint ashore he joined HMAS Australia on 20 October 1919 and was in her until 6 December 1920. Another short shore posting followed before passage home and reverting to the RN on 4 September 1921. We know little else about him other than he was married to Hannah: we are unsure if she came to Australia.

 George Iles was a senior ship’s cook in HMAS Melbourne throughout the First World War. He produced reminiscences of his time in the ship in the form of a diary which provides an interesting insight into life in the ship and its part in the war. Most history is written on the reports or reminiscences of the people in charge – the overall picture. Sometimes it is interesting to read reports from the lower ranks and to look, as it were, under the covers.

He wrote a diary of sorts he called ‘My reminiscencies [sic] of Four and a Quarter Years of War’. Although in diary form, it may have been written or at least transcribed after the war. It is in ink, uniformly throughout, and in fair handwriting. It has been bound and is kept in the State Library of New South Wales.

Melbourne was always on the periphery but did not have an active role in the First World War inasmuch it was not involved in any naval engagements or battles. Little is written about her, although there is a ship’s history in the excellent book aptly titled The Forgotten Cruiser – HMAS Melbourne 1913-1928 by Andrew Kilsby and Greg Swinden, published in 2013. While Kilsby and Swinden have consulted widely with an extensive bibliography including a number of diaries, that of Iles was then unknown to them.

The diary’s title page summarises the ship’s war history as including the capture of Samoa, Nauru and German New Guinea (August – September 1914), convoying Australian troopships to Port Said (September – November 1914,) the sinking of the Emden by HMAS Sydney (November 1914), patrolling off North America and West Indies (November 1914 – August 1916), patrolling and convoying in the North Atlantic (August 1916 – November 1918), the surrender of the German Fleet (November 1918), and the return to Australia (25 February – 26 May 1919).

In many respects the author follows the format of a report of proceedings – where the ship was or was going to, and what it did when it got there (mostly bunkering). Although there are of course many references to what was happening in the ship, there is less than might be expected about the living conditions or what was going on in the messdecks. There is no reference to any friends or shipmates. Nevertheless, it makes for interesting reading, particularly when reporting on the more well-known pieces of history in which the ship was involved.

HMAS Melbourne (1) entering Sydney harbour for the first time 4 October 1913.

Melbourne was an important element of our first fleet that sailed proudly into Sydney Harbour in October 1913 with her better known sister HMAS Sydney. But our author does not dwell upon her arrival or the fact that of her peacetime complement of 390 about half were on loan from the Royal Navy, all being under the command of Captain Mortimer L’Estrange Silver, RN. In fact all the cooks (like Iles) and stewards appear to have been Royal Naval ratings – does this say something about the standard of colonial catering in these times? Another important factor about the ship that only rates a mention in the amount of time spent bunkering is that she was coal fired, which meant constant evolutions of coaling ship and cleaning up afterwards. The largest department was not seamen manning her weapons but stokers, of which she had more than one hundred.

Departure from home

The most dramatic part of the whole diary is the excellent description of the ship’s departure from Sydney with Australia on 3 August 1914:

As we groped our way forward in the darkness, the canopy of heaven above and the deep waters beneath, the silhouettes of the ocean greyhounds were symbolical of Britain’s might, and Australian prowess…never before in history had our vast Empire had reason to feel so proud of England’s sure shield as it was on this memorable day…the mighty steel walls of Britain’s Navy had been called upon to protect not only the free thinking nations of the world, but the whole of Humanity.

Melbourne then spent a couple of months on patrol in the Pacific, trying to find some part of the German Colonies to bombard or part of the German Pacific Squadron to sink. It accomplished neither. She was at Rabaul on 15 September when news was received of the well known disappearance of the Australian submarine AE1. Iles tells us: there were several theories, the most likely being that she had struck a submerged coral reef whilst about to return to harbor, a theory that persists to this day.

In October, Melbourne was called on to escort Australian and New Zealand troopships to the Middle East. On the way to Albany they passed many of these ships: it seemed the side near to us was crowded with Anzacs waving handkerchiefs to us as we sped past them. Melbourne was the first warship to arrive at Albany, and: one by one the transports continued to arrive all through the night forming lines of fine ships as they anchored in position. The impressive escorts the armoured cruiser HMS Minotaur and the battlecruiser IJNS Ibuki joined and HMAS Sydney arrived on 31 October, and on the following day he describes the scene when there were twenty-six troopships and four naval escorts in view:

one of the most memorable days in Australian history – this great assembly of ships began to move – the day was in keeping with events, a cloudless sky which allowed the sun to shine in all its brilliancy, just a light breeze was blowing, and the sea was ripless and this great and representative assembly of men and ships were on the eve of taking farewell of their country, the land of their birth, setting out on a task they knew not where, or how long it would take to accomplish.

While not mentioned in the narrative it is historically important that when Minotaur was unexpectedly detached, as the next senior ship Melbourne was placed in charge of this great Anzac convoy proceeding to the Middle East.

The sinking of Emden by Sydney on 9 November is recorded with his captain: became very frenzied because he could not himself proceed to intercept hostile warship, but he was prevented from so doing on account of his immense responsibility of being in charge of convoy and its safety, and he had to perforce remain with convoy, against his wish……. and each and every one was very excited over impending events and keen disappointment prevailed because we could not go. The news of the sinking of Emden was: great and glorious news and it was a great sight to witness the excitement that it caused among our men. The captain permitted “Splice the Mainbrace” – Sydney done the work, and Melbourne drank the tot, which caused much amusement to the two ships concerned.

All the same, Melbourne missed out on the glory.

Escort duties on the Atlantic and West Indies

Melbourne carried on with her escort duties as far as Colombo, and continued to the Red Sea, Suez, Malta, Gibraltar, and then into the South Atlantic and the West Indies. This was quite uneventful. His diary notes visits to many ports and meetings with other warships, but no naval action. At the end of 1915, he reports: altho our present duties of protecting trade routes were very nice, it was becoming very monotonous, and we all desire change.

Christmas 1915 was celebrated at sea (on 27 December, when men returned from leave). We have some feel for what occurred but there is no specific mention of the important part played by the cooks:

the interior of the ship and all the messes had been gaily decorated, photographs of all the best girls, which had been carefully preserved were on this day given prominent places on the table and bulkheads etc etc, each and all carefully scrutinizing all the fair and pretty faces, that were now exhibited for the first time maybe…dinner consisted of chickens, turkeys sausages, hams, green peas, potatoes, plum pudding and sauce, mince pies, dates, figs, mixed nuts, biscuits, chocolates, lime juice, cigars, and cigarettes, plenty of each item being freely served out.

The ship continued her patrols and drills throughout the Atlantic, visiting numerous ports and meeting up with many warships (including Sydney). Iles is quite thorough in reporting on the ships and what they did and where they were going. There is little reference to news from home. The outcome of the Battle of Jutland was noted on 31 May, but without comment.

Although he clearly enjoyed this period, particularly in the West Indies, they were ready for home as he notes: one and all of us were most eager to go to England to enable us to take a more active part in the Great War. Eventually, on 28 August 1916, Melbourne departed from Bermuda to join the Grand Fleet for operations in the North Sea.

Joins the Grand Fleet

The ship arrived at Plymouth on 7 September, with the good news that all crew were granted three weeks’ leave. Many of the sailors with family links, especially those from the RN after several years away took the opportunity to re-unite with their families. We know nothing of Iles family relationships other than he tells us he had: a beautiful and rainless 21 days in Cornwall (without saying with whom, if anyone). At this time the highly efficient and popular Captain Silver who had earlier contracted malaria sought to be relieved as his eyesight was failing. His replacement was Captain Eric Fullerton, DSO, RN. Then on 6 October: we arrived off Scapa Flow, for this our first introduction to the Greatest Fleet of warships in the world, second to none either in ships, or men, filled us with pride.There is some further detail about the ships and arrangements and harbour security.

The spectacle of the ships was clearly impressive: away on our port beam could be seen a large assembly of warships, the likes of which we had never seen before at least many of the more modern of them and on 1 November: at daybreak we were able to witness for the first time the Great Fleet at sea at least as much as we could see of it because the whole of the fleet that were now at sea covered such a vast area that it was quite impossible to view them all, but as it was there were numberless ships of all classes and description spread upon the ocean in every direction as far as the eye could see.

Then follows a series of exercises and drills, mostly in inclement weather in the North Sea, often in company with HMAS Sydney. The loss of two sailors overboard on 21 December is reported: neither was ever seen again, and no lifeboat could ever live in such a sea, and we were not allowed to stop our engines whilst at sea under no consideration, for fear of an enemy submarine being in the vicinity. Mention is made of the activities of other ships of the fleet with a description of the dramatic collision between the destroyers HM Ships Hoste and Negro when both sank with all hands lost, although he did not witness it.

Christmas 1916 finds Melbourne at Rosyth – a lecture by the Commodore, and: greetings from Commander-in-Chief of the Grand Fleet, the King (and of whom I should have mentioned first; apologies) Rear Admiral Battle Cruiser Squadron, Australian Naval Board, High Commissioner, etc etc. all of which were reciprocated, then church, then we had a sumptuous repast, consisting of poultry, of various kinds, and everything it was possible to have, nuts sweets biscuits, Xmas pudding etc etc, all except anything alcoholic.

On 27 December they were back at sea for exercises for a month when the ship left for an extensive refit at Liverpool: which meant an unlimited amount of leave for the boys. The diary is then compressed until Melbourne rejoins the Grand Fleet at Scapa Flow on 19 June. The ship is at anchor at night on 9 July when: a most curious explosion was felt, not a loud report, but that peculiar heavy thud which accompanies a great explosion. Within a few minutes it was learnt that the Dreadnought battleship HMS Vanguard had sunk (an accidental magazine explosion caused the ship to sink with heavy loss of life). Although in the same harbour, it was four or five miles away. No lights were visible: but far away in that direction could be seen on the surface of the water, a long narrow irregular red glow,which was afterwards discovered to be oil burning on the water.

Exercises continued, but there was no warlike action involving Melbourne. The diary continues with entries on most days, detailing what the ship was doing, and what others were doing. He enjoyed: lectures given by the Captain – one on his own wartime experiences, and another on astronomy. Otherwise the diary for the next 18 months or so settles mostly into a routine report of proceedings.

Then on 11 November 1918, the exciting news that the armistice had been signed: the news came through the Fleet like a bolt from the blue. The celebrations, he tells us, were magnificent. The Admiral of the Fleet ordered “Splice the Mainbrace” and leave was given from 1 pm until 5 pm, when an extra issue of rum was given. Much celebrating for quite some time. He writes at some length about the surrender of the German fleet at Scapa Flow, and then reports on the ship’s transit to Portsmouth on 30 November where she remained until 6 March 1919 with HMAS Australia and HMAS Brisbane.

Homeward bound

On 6 March they began their cruise home, visiting a number of ports on the way. Arriving at Sydney on 21 May 1919, the first time in this port since 17 October 1914. The ferries, motor launches and steam boats lined our course, and rousing cheer upon cheer and coo-ees were sent up continually upon our return and so under such an enthusiastic welcome we made our way to Garden Island… As soon as possible the Governor-General came on board Melbourne and personally welcomed our return to Sydney and Australia after having done our duty. On the following day: a banquet was given at the Town Hall in our honour and invitations extended to all officers and men, many speeches were given and the event was a huge success.

On 26 May the ship arrived at Port Phillip. At this time Melbourne was the temporary Federal capital so there was a long list of distinguished visitors including the Governor-General – Lord Denman, the Prime Minister – Mr. Fisher and the Minister for Defence – Senator Millen. The author says here: a similar welcome as at Sydney awaited us and a most enjoyable time was spent by all. The ship’s company proceeded on extended leave and so, he notes: ended a glorious and historical career in the pioneer Australian man-o-war and though bloodless she had done her duty nobly and well, for whether you be at grips with the enemy or patrolling the sea communications it is all a duty in war. He tells us that: during hostilities the ship had travelled approximately 145,000 nautical miles – not too bad a record as prior to the war she had only steamed 25,000 nautical miles. Melbourne served honorably in peace and war; while no shots were made in anger she served in many war-zones and helped preserve Allied superiority. Eight of her ship’s company died during her war service and many others were injured.

And so ended George Iles’s reminiscences. All in all, the diary gives an interesting insight into the ship and its activities, although it reflects little of George Iles’s personality. It does show how life at sea in the Navy was mostly routine, certainly not necessarily always one of adventure and action. Although he was not involved in any naval action, he was justifiably proud of his contribution to the war effort.

The diary, or reminiscences, occupies some 312 pages, all handwritten. It provides a good chronology of the ship’s activities during the war, and is one more example of how so much of history, insignificant though it might be, can be hidden in the writings of those who were there, regardless of rank, role or status.


HMAS Encounter (1905 – 1932)

January 5, 2015

The cruiser HMS Encounter (later to become HMAS Encounter) was laid down at Devonport Dockyard, United Kingdom on 28 January 1901. She was launched 17 months later on 18 June 1902 by Lady Sturges-Jackson who was the wife of the Admiral Superintendent of Devonport Dockyard. Encounter was finally commissioned on 21 November 1905 under the command of Captain C F Thursby RN (her completion was delayed as a result of a fire onboard during her outfitting and she was not actually ready for service until 16 December 1905). Encounter and her sister ship HMS Challenger, completed in 1904, were classified as Challenger Class light cruisers and were the only two of the class to be built.

Challenger and Encounter were described as good sea keeping ships with ample freeboard and a coal bunkerage capacity that was adequate to ensure a sustained cruising endurance. The two could be distinguished as Challenger had funnel tops that sloped aft whereas Encounter‘s were horizontal and thus parallel with the deck line.

Shortly after commissioning Encounter was ordered to sail for Australia to become part of the Royal Navy Squadron on the Australia Station. The cruiser departed Sheerness, Kent, on New Years Eve 1905 and set sail for Australia. Needless to say many of the Ships Company were unhappy with this departure date, as they had planned to spend the time with their families. The commission on the Australia Station was originally intended to be only for two years but Encounter was destined to never return to Britain.

The ships company’s morale was not improved when a rumour began to circulate that the ship was top heavy and that she would not be able to safely cross the often storm lashed Bay of Biscay. Fortunately the weather in the Bay of Biscay was mild and the ships stability in this area was not tested, although several Royal Marines taking passage to Australia, to join the Marine Contingent at Garden Island, suffered from the inevitable seasickness. Encounter continued on her journey to Australia via the Mediterranean, Suez Canal and Indian Ocean and arrived at Sydney in March 1906.

On arrival in Sydney she was inspected by the Commander in Chief of the Australia Station, Vice Admiral Sir Wilmot Hawkesworth Fawkes KCB, RN. The gun crews had spent a great deal of time and effort to clean and polish the Encounter’s six-inch guns and ‘soon had them looking like burnished silver’. As the Admiral was inspecting the ship he was supposedly heard saying to the Captain of Encounter in a dejected voice They’re all breech loaders, I suppose? perhaps thinking back to the days of sail and muzzle loading weapons. The gun crews were to say the least not impressed with this comment.

Encounter replaced the cruisers Katoomba and Mildura that had already departed for Britain where they were decommissioned and sold for scrap. HMS Encounter’s role on the Australia Station was to conduct regular ‘showing the flag’ cruises to Australian and New Zealand ports and to the islands of New Guinea and the South West Pacific. She also became the training ship for Australian seaman who had joined the Royal Navy. She frequently visited Hobart to take part in the annual regatta held each year. Her activities were not all easy as she was also constantly at sea conducting regular exercises with other ships and frequent gunnery shoots.

During 1907, Encounter had an incident onboard when she was calibrating her guns. Calibrating the ships guns required each gun to be fired with a full charge. As one Encounter sailor recalled – Nobody knew much what calibrating meant, much less how to work out the muzzle velocities, but we knew each gun had to fire in turn with a full charge. When it came to No 4 gun Starboard it was fired and it immediately recoiled right out of its cradle and came to rest on the upper deck to the rear of the gun-shield. Luckily there were no casualties, but it took an awful lot of red tape and files of correspondence and numerous inspections to prove that the piston nut was defective. I suspect the real and unofficial cause was that the unfortunate armourer forgot to fill the recoil cylinder and therefore there was no hydraulic action.

As a result of this incident all personnel onboard Encounter regardless of rank or rating were required to know the workings of the six-inch gun. Even the ships Paymaster Midshipman was required to become qualified on the weapon.

In early 1908 she proceeded to Colombo (Ceylon) to collect her new crew. This was a standard practice in the Royal Navy at the time where ships would stay on the Australia Station but her crew would change over every two years. On arrival at Colombo the crew who had brought Encounter out to Australia in 1906 disembarked and joined another ship to return home to Britain. Encounter with her new crew, and under the command of Captain P H Colomb RN returned to Australia.

In August 1908 the flagship of the Australia Squadron HMS Powerful, accompanied by Encounter and the third class protected cruiser HMS Pioneer (later HMAS Pioneer) sailed to New Zealand to welcome the United States Great White Fleet that was on its circumnavigation of the globe. While Powerful returned to Sydney with the US Fleet, Encounter remained in New Zealand waters until returning to Sydney in late November.

Tragedy struck Encounter early in 1909. On 5 January 1909 the cruisers pinnace was travelling between the ship, which was alongside at Garden Island, and Man ‘o’ War steps when it was run down in the vicinity of Lady Macquaries chair by the coastal steamer SS DUNMORE. Onboard the pinnace were 60 sailors, all in full marching order with rifles slung across their backs, who were going ashore to take part in a shoot at the rifle range at Long Bay.

As the DUNMORE hit several sailors were thrown into the water and due to the weight of equipment they were carrying, and the effect of having their rifles slung, some could not stay afloat until help arrived. As a result 15 sailors drowned and were subsequently buried at Rookwood Cemetery in the Anglican Naval Section. A large memorial still stands there to this day. From this tragedy and the subsequent Court of Inquiry the slinging of rifles by sailors in boats was discontinued.

The remainder of 1909 saw Encounter undertake routine peacetime activities such as visits to Australian ports (along the eastern seaboard) and New Zealand. Following a short period at Cockatoo Island Dockyard in November for a ‘Bottom Scrape’ (removal of barnacles and other marine growth from her hull) the cruiser proceeded north to Brisbane. On 8 December she arrived in Brisbane and picked up Field Marshal Lord Kitchener and his staff who were on a tour of Australian defence facilities (they had been invited to Australia by the Deakin government to tour the nation and make recommendations on the countries future defence). The cruiser then visited Darwin, Thursday Island and Townsville before returning to Brisbane in early January 1910 to allow Lord Kitchener and his staff to disembark.

Following a short visit to Hobart, Encounter collected Lord Kitchener and his staff again, in early February from Williamstown in Melbourne, and took them to New Zealand for further inspections of defence sites. The cruiser returned to Sydney in early March to disembark their passengers. Following this Encounter steamed via Melbourne and Fremantle on her way to Colombo to collect her ‘new’ crew.

Encounter arrived at Colombo on 9 April 1910 and her ‘old’ crew disembarked and returned home to Britain in the cruiser HMS Hawke. Captain Colomb and a smattering of her ‘old’ crew stayed onboard to assist the ‘new’ crew. The cruiser then returned to Sydney via Fremantle. By July she was back into the routine of visits to Australian and New Zealand ports interspersed with periods of exercises and gunnery shoots with other ships on the Australia Station.

It was also reported in early 1911 that Encounter, along with other ships on the Australia Station, was beginning to suffer greatly from desertions. The lifestyle in Australia was deemed far better than that in England and many Royal Navy sailors were reluctant to return home for further service in the Royal Navy.

In February 1911 the cruiser was being prepared to take part in the British and Australian Solar Eclipse Expedition. This involved ferrying the scientists and their equipment from Sydney to the island of Vavau (in the Vavau Group east of Fiji) to witness the eclipse and act as the support vessel for the scientists. Encounter departed Sydney on 25 March and arrived at Vavau on 2 April.

She remained there to support the expedition until 4 May when she departed with the scientists and returned to Sydney via Fiji. She arrived back in Sydney in mid May and following a short period of leave was back into the old routine of exercises off the east coast and visits to Australian and New Zealand ports. It was on her return to Sydney that Captain Colomb departed the ship and handed over to Captain S A Hickley RN who became the cruisers new Commanding Officer.

In September 1911, Powerful and Encounter carried out exercises simulating night torpedo attacks, off Jervis Bay, with Torpedo Boat Destroyers of the newly created Royal Australian Navy. One of Encounter’s men remarked at the time – There seems to be some difficulty in getting colonials for the Australian Navy. Whether they succeed in establishing a Navy manned exclusively by Australian born men remains to be seen.

1912 found the cruiser in Hobart for the annual regatta, and then back in Sydney for a short refit at Cockatoo Island Dockyard in March. Following this she proceeded to New Zealand waters for further training exercises, gunnery shoots and port visits. In late April she took part in the unsuccessful search for the missing Dredger ‘MANCHESTER’ which had disappeared on a voyage from Wellington to Sydney. She returned to Auckland on 6 May without finding any trace of the vessel or her crew. In late May she returned to Sydney. On 21 June 1912, Encounter was paid off from the Royal Navy and the bulk of her officers and crew joined HMS Challenger for return to England.

Encounter was then commissioned into the RAN on 1 July 1912 under the command of Captain B M Chambers RN. Several Royal Navy officers and ratings stayed onboard Encounter, which then became the training cruiser for the fledgling RAN. These men while still Royal Navy were under the control of Australian Government and were paid RAN rates of pay, which was significantly higher than that of the RN. Thus Encounter became the first cruiser to serve in the RAN. Although commissioned into the RAN she was considered to be only on loan, until such time as the cruiser HMAS Brisbane, which was then being built at Cockatoo Island Dockyard, was completed and brought into service.

Captain Chambers also had the added responsibility of overseeing the opening of the new Royal Australian Naval College (temporarily located at Osborne House at Geelong) and had to alternate his duties between Encounter and the College. Eventually he requested that he be able to devote all his time to the College and left Encounter in March 1913 to take up full time command of the RAN College.

In mid 1913 the RAN fleet unit of HMA Ships Australia, Sydney and Melbourne, that had been built in England, sailed from Portsmouth on their voyage to Australia. In late September Encounter (now under the command of Captain A G Smith RN) and the torpedo boat destroyers HMA Ships Parramatta, Yarra and Warrego sailed from Sydney and proceeded south to Jervis Bay where by 2 October they were waiting for the arrival of the three new warships. The three new warships arrived on 3 October and the rest of the day was spent touching up all ships paintwork, polishing brass and whitening all the ships ropes in preparation for the RAN’s first fleet entry into Sydney Harbour.

Early on the morning of 4 October 1913 the RAN Fleet Unit set sail from Jervis Bay and by mid morning was approaching Sydney Heads. Shortly after arriving off the heads the Fleet, preceded by the battlecruiser Australia, entered Sydney Harbour as a Fleet Unit for the first time. Australia was followed by Sydney, Melbourne, Encounter and then the Torpedo Boat Destroyers. The Fleet came to anchor in Sydney Harbour amid much jubilation from the people of Sydney. The arrival of the RAN’s warships on their first ceremonial entry to Sydney was yet another visible sign of Australia’s steps towards nationhood.

Encounter continued with her normal peacetime activities for the remainder of 1913 and into early 1914. She was in Sydney on 24 May when the two new Australian submarines AE1 and AE2 arrived following their marathon journey from England. By mid 1914 the clouds of war were gathering in Europe, but on the Australia Station the chance of war in Europe while possible was still remote. In mid July the Australian Squadron sailed from Sydney on their routine Winter Cruise to Queensland waters. On 24 July 1914, Encounter was at Gladstone and by 30 July she was in Townsville when a signal was received indicating that war with Germany was imminent and all Australian warships were ordered to return to their operational bases.

Encounter, now under the command of Captain Lewin RN, returned to Sydney with all possible haste and on return she began to undertake repairs and maintenance in order to be ready for whatever eventuated. On 4 August 1914 war with Germany was declared. Encounter cut short her repairs and was ready for sea by the morning of 6 August. She then sailed to join up with Australia.

To the north of Australia lay the island of New Guinea and islands of the Bismarck Archipelago. The northern portion of New Guinea and several of the islands formed the German Colony known as German New Guinea. The Australian Government quickly formed an expeditionary force known as the Australian Naval and Military Expeditionary Force (ANMEF) which they planned would capture this colony and thus deny the use of the colony to ships of the German Pacific Fleet based at Tsingtao in China. This in turn would reduce the risk that the German warships would then mount attacks on Australia and its coastal shipping. The ANMEF was destined to sail northwards escorted by ships of the RAN.

Prior to this however the Australian Squadron, including Encounter had begun patrolling the St George’s Channel near the German island of New Britain on the lookout for enemy warships. One sailor reported ‘ We were all pins and needles at the time, expecting to bump up against the German cruisers SCHARNHORST and GNIESENAU’. On 12 August the lookouts in Encounter sighted smoke on the horizon and Captain Lewin ordered his men to action stations. Men in the other Australian ships recalled how they saw the cruiser steam off towards the smoke with the sound of the bugle, calling her crew to action, floating back towards them. Encounter’s gun crews rushed to their weapons and, stripped to the waist, prepared to do battle.

Other men began to throw overboard any wooden or inflammable items to prevent fires in case of hits by enemy shells. One of the items eagerly thrown overboard was the cruisers large and unwieldy accommodation ladder. This much-hated ladder had caused several broken toes and crushed feet in its time, as it was heavy and difficult to carry into place. It went overboard in record time. Also thrown overboard were cabin fittings, officers furniture, bedding and clothing.

Unfortunately the ‘enemy warship’ proved to be only the British Steamer ZAMBESI, which had been commandeered by the German Administrator of Nauru to carry dispatches and stores to Rabaul. A shot across the bow of the ZAMBESI brought her to a halt and a boarding party from Encounter was sent across to the ship. Onboard was found a quantity of cement and steel destined for the wireless station at Rabaul and two Germans who were escorting these stores as well as carrying documents for the Administrator of Rabaul.

ZAMBESI was taken as a prize ship, the first for the RAN, and sent back to Sydney under the command of Lieutenant R C Garsia, RAN. Garsia later saw action onboard Sydney when she destroyed the German raider EMDEN and became a long serving officer in the RAN reaching the rank of Captain.

Two days later it was recorded in the diary of one German official at Rabaul, that at the village of Mioko, that wreckage which included cabin furniture, a broken oar, a small red buoy and a HMAS Encounter cap ribbon had been washed ashore. The Germans incorrectly surmised that Encounter had been sunk by one of their warships when in fact the ‘wreckage’ more than likely came from the items thrown overboard when Encounter went to action stations. Further diary entries in September reported that natives at Buka had, incorrectly, claimed Encounter sunk by a big ship with many funnels.

On 15 August, Encounter proceeded to Port Moresby to coal ship and then when this was completed sailed south. Coaling ship was a major evolution with all hands employed on the task. The men wore their oldest and most worn clothes for this hard and dirty task that involved bringing the coal onboard in baskets and tipping them down hatches, on the upper deck, into the ships coal bunkers. The ship was swathed in coal dust and it took the men several days to clean the dust out of their skin and eyes.

By 24 August the cruiser was at Palm Island off the north coast of Queensland (Palm Island is to the north of Townsville and inside the Great Barrier Reef). Here she was joined by the cruiser Sydney and the troopship HMAT Berrima carrying ANMEF personnel from Sydney and Melbourne who would act as a landing force in German New Guinea. It was originally planned that the three ships would sail to Port Moresby and on the way rendezvous with the troopship KANOWNA that was carrying more troops (some 500 volunteers from the Queensland Kennedy Regiment).

This plan was delayed when Rear Admiral Patey, RN who commanded the Australian Fleet ordered the ships to stay at Palm Island while the battlecruiser Australia escorted a New Zealand force to seize the German Island of Samoa. Patey was initially worried that the two cruisers would be no match if they met the German Pacific Fleet with its heavy battlecruisers SCHARNHORST and GNIESENAU.

Eventually on 2 September the three ships, now joined by the oiler AORANGI, were ordered to sail for Port Moresby where they were to replenish with coal and oil. The four ships arrived at Port Moresby on 4 September 1914 where they met up with the troopship KANOWNA and the warships Warrego, Yarra and the submarines AE1 and AE2. On the morning of 7 September the nine-vessel convoy departed Port Moresby bound for Rossel Island on the eastern tip on New Guinea. Unfortunately due to a problem with the stokers onboard KANOWNA (who mutinied and refused to take the ship out of Australian waters without extra pay) the ship was unable to keep up with the convoy and had to be left behind.

At Rossel Island the convoy met up with the battlecruiser Australia and they then sailed onto the island of New Britain (then known as New Mecklandburg). On 10 September Australia and Berrima left the convoy and steamed on ahead to Rabaul while Encounter remained behind with the submarines and two other colliers (WAIHORA and WHANGAPE). At 0600 on 11 September 1914 Encounter linked up with Australia and Berrima in the vicinity of Cape Gazelle (New Britain) and then steamed on past Herbertshohe (Kokopo) as far as Karavia Bay.

Naval Reservists and soldiers from Berrima then landed at Kabakaul (south of Rabaul) just after dawn and began to push inland to seize the German wireless station at Bita Paka. The first Australian casualties of the war were suffered that day when five Naval personnel and one Army Medical Corps officer were killed in action or died of wounds in action against German native troops commanded by German Army Reservists. Encounter remained in the vicinity of Herbertshohe, for the rest of the day, protecting the convoy from possible attack by German warships (the location of the German Pacific Fleet was still then unknown and it was expected that the attack on Rabaul could bring about an attack by German warships).

The following day Encounter landed a 12 pounder gun and machine gun with crews to assist with the occupation of Rabual and the surrounding districts. On the night of 13/14 September Encounter rendezvoused with Parramatta off Praed Point and the two ships were tasked with supporting Australian forces under Colonel W Watson who were continuing to push inland. On 14 September Encounter was called on to provide support by shelling the ridges near the village of Toma. The effect of this shellfire was described as having the desired effect as the Australian forces were met by German troops waving a flag of truce. Toma was subsequently occupied without any opposition by the German forces in the area.

During 15/16 September Encounter was involved in the search for the submarine AE1 that had failed to return from a routine patrol in the St George’s Channel on 14 September. No trace of the submarine was ever found and it is believed she had struck an uncharted reef while submerged. Encounter’s crew did however locate a burnt out launch, with a quick firing gun on it, stranded on an outlying reef. It was put forward at the time that the launch had sunk the AE1, but this was pure speculation as no wreckage or oil from the submarine was ever found.

By 17 September the German land forces at Rabaul were in a state of disarray and they surrendered on 21 September. On the same day, however, the Allied warships off Rabaul were advised to be ready to repel an attack by German warships believed to be in the area. No attack eventuated and it was later revealed that the German Pacific Fleet was avoiding German New Guinea (perhaps fearing the superior firepower of the battlecruiser Australia) and was heading eastwards across the Pacific in order to return home to Germany.

The next task of the RAN and ANMEF was to seize the German outposts on the north coast of New Guinea. On 22 September, Australia, Encounter, Berrima and the French cruiser MONTCALM sailed for Freidrich Wilhelm Harbour (Madang) with orders to land troops and seize the area. The ships arrived on 24 September and Encounter entered the harbour flying a flag of truce, which was a risky business as it was not known if the harbour was mined or defended by shore based guns.

Encounter sent her steam pinnace ashore with Captain Travers, Lieutenant Lyng (a Dane who was fluent in German) and a captured German officer. They brought back three German civilians who agreed to the surrender and occupation of the town without resistance. Australia’s picket boat then swept the harbour for mines and finding none allowed Berrima to enter and discharge her troops (both soldiers and Naval Reservists) who then took control of the town. Encounter remained in harbour with Berrima while Australia and MONTCALM patrolled outside the harbour.

Following the capture of Freidrich Wilhelm Harbour the four Allied ships proceeded north along the coast to Port Grand Duke Alexis (some 12 miles north of Freidrich Wilhelm Harbour) to put troops ashore and seize this area. Unbeknown to them the German gunboat CORMORAN was hiding in one of the many small bays of the port. CORMORAN was one of the German vessels of their Pacific Fleet and had escaped from Tsingtao in August. She was well hidden in the bay with overhanging jungle covering much of her hull and superstructure.

When the Allied ships reach Port Grand Duke Alexis, Australia and MONTCALM remained outside the harbour to protect the seawards approaches from possible attack by German warships. Encounter and Berrima entered the harbour and proceeded to put the troops ashore. The commanding officer of CORMORAN, Korvetten-Kapitan (Lieutenant Commander) Zuckschwerdt, had sent his men to action stations but had no intention of opening fire against the larger and better armed Encounter unless he was forced to do so. It was a tense moment for the Germans as Encounter slid past them at a distance of only 100 metres or so, but without seeing the German vessel.

CORMORAN remained hidden until after the Allied ships had departed and then crept out of the bay under the cover of darkness. She had been sent to undertake operations against merchant shipping in the area, but because of the large number of Allied warships present she left the area quickly and eventually sought refuge at the American island of Guam where she was interned. The Allied ships had in the mean time returned to Rabaul.

On 1 October, Australia, Encounter, Sydney, and MONTCALM sailed from Rabaul and proceeded north to meet up with a Japanese cruiser squadron, however they were not located and the four ships returned to Rabaul on 3 October. The following day the Australian Military commander at Rabaul, Colonel (later Major General) William Holmes, received information that suggested the German warship KOMET was hiding somewhere along the north coast of New Britain. He wrote a quick note to Captain Lewin in Encounter requesting he conduct a search along the coast for KOMET.

This note arrived just as Encounter was preparing to sail for Suva, Fiji as escort to a convoy consisting of Parramatta, Warrego, AE2 and four merchant ships. Lewin quite rightly replied that he had orders to proceed to sea with this convoy and could not take any action to search for KOMET. He also advised that he did not consider KOMET a risk, as the RAN ships HMAS Sumatra and HMAS Nusa were capable of preventing any action by KOMET.

Holmes then ordered Nusa to search for KOMET. Nusa, which was armed with a single 12 pounder gun, sailed from Rabaul on 9 October with infantry and a machine gun embarked. She subsequently discovered KOMET on 11 October and seized the vessel without casualties on either side. KOMET was later commissioned into the RAN as HMAS Una and conducted patrols throughout the New Guinea island group during the war.

Encounter continued with her plan to escort the ships to Suva. These ships were to take part in further operations to size German colonies in the South West Pacific. On 11 October Encounter was required to take AE2 in tow as the submarine was suffering from engine problems. The convoy arrived at Suva on 15 October during a very heavy rainstorm.

During her period in and around Fiji, Encounter captured the German schooner ELFREDE that was then sailed to Samoa as a war prize (the prize crew consisting of Lieutenant W.B. Wilkinson who had been trained in sail and two sailors). On another occasion an armed party was put ashore from Encounter to take possession of a German residency on an outlying island.

The story is told that the path to the bungalow was steep and the day hot and by the time the men arrived they were drenched in sweat. A German housewife sat on the verandah knitting and her husband was fixing the chicken coop with a hammer. The officer in charge of the patrol was a little confused as to what he was supposed to do but was put at ease by the German housewife who said – It is very hot: would you care for a glass of lager Herr Hauptmann. This was fetched and the members of the patrol were surprised to see this normally stiff necked and zealous young officer consuming the beer provided to him by one of the ‘Kings Enemies’! It is not known if any of the sailors in the patrol also received a glass of beer!

Encounter returned to Sydney in early November 1914 and commenced a refit to repair damaged and worn equipment after a hectic three months of war service in the tropics. She had achieved two notable firsts being the capture of the ZAMBESI on 12 August and the first shots fired in anger by the RAN with her bombardment of Toma Ridge on 14 September.

1915 found Encounter still at Garden Island undergoing a refit and on completion of this she undertook more convoy escort work and patrols on the Australia Station. On 12 July 1915 Encounter departed Sydney with stores and troops for the garrison at Fanning Island in the Gilbert Island group. Fanning Island had a cable station situated on it and it had been raided and destroyed in September 1914 by the crew from the German warship NURNBERG. Since then a small garrison had been situated on the island to protect it against another possible raid.

Encounter arrived at Fanning Island on 13 August and offloaded the stores and troops. She then departed and proceeded to Johnson Island. Sub-Lieutenant Stan Veale RANR who was serving in Encounter at the time described their short visit to Johnson Island – Our chart of the locality was dated December 1863 and did not show a reef about 200 yards off the island. The Navigator (Lieutenant George Langford RAN) was sent up into the foretop to keep a lookout for and report any hazards he observed, while the Captain took over handling the ship.

The first we knew of the reef was when we bumped over it into a deep lagoon, and anchored. I was sent with Langford in a skiff to find a way out. After much sounding with a hand lead line we found a passage to open water, and the old girl made her exit and then proceeded to Fanning Island, where we anchored again, in 6 fathoms at the bow and 20 fathoms at the stern.

Stagings were slung under the ship and Petty Officer Diver Lee put on diving dress and was lowered over the side onto the stagings, which were worked along aft. Lee sent up a slate on which he showed that our bottom was corrugated from under the bridge, then aft to a position under the mainmast.

We cruised all over the Pacific in that condition until we relieved HMS Cornwall on the Banka Strait Patrol (south of Singapore) on 10 December 1915. On 30 December 1915, we entered Kings Dock, Singapore where we saw the extent of the damage to the bottom. We marveled that the old bus had not been holed and stranded high and dry on Johnson Island forever ((Johnson Island was one of the sites of the US Atomic testing after World War II and the island was destroyed as a result of this testing.)). It was hell living onboard while crowds of Chinese and Indian ‘Dockyard Mateys’ worked day and night and made us seaworthy in three weeks.

Following her running aground at Johnson Island, Encounter spent most of the latter part of 1915 patrolling in Pacific and South East Asian waters. There were several rumours throughout 1915-16 of the potential for German induced uprisings in the British colonies of South East Asia. Encounter and the cruiser HMAS Pysche and the destroyers Parramatta, Yarra and Warrego were attached to the Royal Navy to conduct patrols throughout the region.

Despite the damage received at Johnson Island, Encounter was kept on patrol until a suitable time in dock could be arranged. She visited Hong Kong, cruised along the coast of Borneo and Java, and visited Christmas Island before going to Singapore for repairs to her hull in December 1915. After completion of repairs to her hull in mid January 1916, Encounter remained in Malayan waters conducting patrols.

On 24 January 1916 Captain Claude Cumberlege RN took over as the cruisers new commanding officer. In mid February the cruiser was recalled to Australia for convoy escort duties as at that point Australia was completely without naval protection. This was to be Encounter’s lot for much of the war as there were no other Australian cruisers left on the Australia Station (either being deployed to the North Sea, or South East Asian waters). The Japanese did provide two cruisers, CHIKUMA and HIRADO (each with eight 6 inch guns) for convoy escort work and patrol work on the Australia Station in 1917-18.

Convoy escort work and patrols, in Western Australian waters, occupied Encounter and her ships company for the remainder of 1916 and into 1917. In July 1916, Encounter visited Graham Moore Island (now known as Carronade Island) located in Napier Broome Bay off north western Australia.

Captain Cumberlege had obtained information that two old Portuguese brass carronades (small cannon) were on the island and he intended to recover them. The two weapons were found on the highest point of the island buried upright with about two feet of each protruding above the surface.

A search of the island and surrounding waters was made for further artifacts and despite some furious digging by both officers and men nothing else was found. The two carronades were removed and presented by Captain Cumberlege to the Sydney depot ship HMAS Penguin. The two carronade were displayed onboard Penguin for some years and then later on the lawn outside the main office building at Garden Island. At time of writing they are in storage at the Naval Repository at Spectacle Island.

How the carronades ended up on the island is uncertain, however, in 1909 a member of the crew of a pearling lugger described an Aboriginal ceremony he saw conducted on the island. The ceremony was a re-enactment of a battle between the aborigines and two boatloads of white men in armour (replicated by canoes and men wearing sheets of bark) with bark tubes in the bow of each canoe (representing the carronades). The sound of the carronade firing was replicated by loud blasts on a conch shell. The aborigines eventually triumphed over the white invaders and the carronades seized as trophies of the fight.

It is believed the white men were Portuguese sailors and noting the age of the weapons the battle had taken place in the late 1500’s. Interestingly Cumbelege made no mention of any Aboriginals on the island in 1916 and his removal of the weapons was not contested despite the island having been a home to the local Aborigines only a few years before.

Encounter remained in Western Australia to protect shipping operating off the south western coast up until late March 1917. On 3 April she was dispatched to New Zealand to collect and escort a convoy of troopships to Fremantle. At Fremantle the New Zealand troopships joined up with Australian troopships and proceeded to Colombo, but with the more modern Japanese cruisers as the escorts. Encounter then commenced regular cruises between Fremantle and Sydney calling in at Port Melbourne and Adelaide on occasions.

In July the German raider WOLF was active along the east coast of Australia laying mines, off Gabo Island, which eventually sank the merchant ship SS CUMBERLAND. WOLF laid her mines off Gabo Island on 3 July 1917 and her captain (Captain Karl Nerger) claimed that Encounter had passed her while she was engaged in minelaying, however, official Navy records have Encounter in harbour at Port Phillip Bay at the same time that Nerger claims she was off Gabo Island.

On 6 August 1917, WOLF intercepted and captured the Burns-Philp merchant ship SS MATUNGA on her way from Sydney to Rabaul. MATUNGA was carrying coal for HMAS Una (formerly the German warship KOMET) and men of the ANMEF who were either reinforcements or men returning to Rabaul from leave. When it became obvious that MATUNGA was overdue, and a search by other ships including Una failed to find any trace of her, it was suspected her disappearance was the work of the same raider that had laid the mines off Gabo Island. In late August Encounter was dispatched from Sydney to Samarai (New Guinea) to commence a search for the mysterious raider in the Solomon Sea.

By this time WOLF had sunk MATUNGA and had sailed west along the north coast of New Guinea into Dutch East Indies waters. The Australians did not know this and Encounter disguised herself as a ‘tramp steamer’ and sent signals by wireless in an attempt to convince the raider that she was a merchant ship that had been sent to replace MATUNGA.

Encounter carried out a search for the raider in the vicinity of Woodlark Island and the Louisade Archipelago. The Japanese cruiser HIRADO was also called on to accompany Encounter but the Japanese Admiral refused to believe a raider was active in the region despite a number of missing ships in the Pacific region and would not allow the cruiser to take part in the search!

When the attempt to lure the unknown raider into action failed and her whereabouts was still unknown, news was received of more raider activity raider in the Pacific (at the time the Allies were unsure if there were one or two raiders active in the Pacific). At the same time as WOLF was causing havoc in Australian and South West Pacific waters, another German raider became active in the far eastern Pacific region. This was the only sailing vessel to operate as a raider, the SEEADLER, commanded by the flamboyant Count Felix Von Luckner.

SEEADLER had left Germany in December 1916 and after a mixed career in the Atlantic and Pacific Oceans, in which she sank 14 Allied merchant ships and sailing vessels, she ran aground on Mopelia (sometimes spelt Mopeha) Island, in the Low Archipelago, on 2 August 1917.

Luckner and his crew escaped from the wreck and attempted to pass themselves off as shipwrecked Swedish mariners but they were captured and became Prisoners of War (they were placed in a POW Camp in New Zealand camp). Von Luckners career in SEEADLER and his antics as a Prisoner of War are not the subject of this history of Encounter, and any reader who wishes to know about SEEADLER’s career should read the book ‘The Sea Devil’ by Lowell Thomas for a better, although somewhat dramatized, description of this ships career and her interesting Captain.

The wreck of SEEADLER on Mopelia Island was soon reported and Encounter was dispatched to investigate the wreck and look for other members of her crew. HIRADO was sent to Fiji to search this area for the suspected second raider and the new Australian cruiser HMAS Brisbane was sent to the Solomon Islands on a similar mission.

Encounter arrived off Mopelia Island on 9 November 1917. Chief Petty Officer Stidston who served in the cruiser at the time recorded the following in his diary:

9 November 1917 – 1000 HMAS Encounter arrived Mopelia Island. We could see the German raider SEEADLER on the reef between two islands. She had been set on fire before being abandoned and was practically gutted. Officers and men went aboard and found two 4.1-inch guns intact and some ammunition that escaped the fire. Through field glasses, huts could be seen on the island. Commander Wilmot, the Chaplain (Vivian Ward Thompson), and Sub-Lieutenant Harris set out to search the settlement that the Germans had built. They found a considerable amount of stores, enough to last some time.

10 November 1917 – A working party under Engineer Commander Brand and Lieutenant Commander Matheson boarded SEEADLER and brought off one 4.1-inch gun and miscellaneous ships gear.

11 November 1917 – 0600 A party went aboard the ship and put a charge of explosives in the remaining gun mounting and destroyed it. 0900 We sailed for Tahiti, 260 miles away.

Encounter reached Tahiti three days later. While there her steam pinnace was sunk when run down by a large motor yacht, but fortunately unlike the 1909 incident there were no casualties. This was the last ‘excitement’ in Encounter’s varied war career. She returned to Sydney and went into refit in December 1917. In the New Year, with the possibility of another German raider becoming active, she carried out regular patrols in Western Australia waters from April to July and then cruised between Fremantle and Sydney for the remainder of the war. On 18 November 1918 she was dispatched to Samoa and surrounding islands to provide assistance during a major outbreak of Influenza.

Her wartime crew consisted of 475 personnel. She carried only 21 ‘permanent’ officers (ie not including officers under training) which consisted of the Captain, Executive Officer (often called the Commander), five seaman Lieutenants (including the Navigator and Gunnery Officer), Engineer Commander, Engineer Lieutenant, Engineer Sub Lieutenant, Chaplain, Surgeon, Staff Paymaster, Assistant Paymaster, Chief Artificer Engineer, three Gunners of whom one was a Torpedo Specialist, Carpenter and two Artificer Engineers.

Of note is that many men spent their entire war service in Encounter (affectionately known as the ‘Old Bus) and that she was generally a happy ship. There were, however, many in her crew who longed for more activity. Officers posted to her considered they were serving in a second rate ship and long for a draft to one of the more modern Australian cruiser’s serving in the North Sea. Encounter’s desertion rate amongst the younger members of her crew was high. Many deserted and joined the AIF in order to undertake more ‘fulfilling’ active service.

A small cross section of her deserters is listed as follows:

Ordinary Seaman Richard Oswald Rapley deserted 28 June 1915 and joined the 8th Brigade Australian Machine Gun Corps. Reported Killed in Action 16 September 1916.

Ordinary Seaman Francis Trenery Guest deserted 15 July 1915 and joined the 3rd Battalion AIF. Reported Killed in Action 14 April 1918 (no known grave).

Ordinary Seaman Orlando James Lockyer O’Brien deserted 4 March 1916 and joined the 12th Light Horse Regiment. Returned to Australia 20 July 1919.

Stoker Harold Bendik Pittersen deserted 12 May 1916 and joined the 32nd Battalion and served under the assumed name of Harry Scott. Reported as Died of Wounds 18 April 1918.

Stoker 2nd Class David Timms Young deserted 21 June 1917 and served in the AIF under the assumed name of Brown. Full details not known.

Ordinary Telegraphist John Edward Boag deserted 1 June 1918 and joined the 10th Battalion AIF under the assumed name of Redmond. Arrived in Britain too late to see active service on the Western Front so transferred to the British Army and saw service in North Russia as part of the North Russia Relief Force. Served in the 2nd AIF during World War II.

With the exception of Pittersen all were ex Boys from the Training Ship HMAS TINGIRA and about 18 or 19 years of age.

With the end of hostilities and the demobilization of many of the RAN men who were ‘time expired’ the crew of Encounter was reduced in size and some of her armament was removed. From early 1919 until late 1920 Encounter was the seagoing training ship for the Fleet and an Instructor Lieutenant was added to the complement. Instructor Lieutenant M H Moyes RAN who had served with Mawson in the Antarctic in 1912-14 served in Encounter during most of 1920.

During her period as the training cruiser she took onboard many boys who had completed their training in the Training Ship HMAS Tingira and were now getting their first real taste of life at sea. The ‘Old Bus’ visited most Australian ports during this time. Although still considered to be only on loan to the RAN, Encounter was now considered an obsolete warship and was gifted outright to the RAN in early 1919.

Encounter was in Sydney in late May 1919, when the bulk of the Australian Squadron returned home from their service with the Royal Navy in the North Sea and Mediterranean. A month later she was the centre stage when the court martial of five mutineers from Australia took place onboard. Encounter’s commanding officer Captain J F Robins RN was a member of the Court Martial board.

When Australia returned home after five years of war her crew were weary and looking for a period of rest and relaxation. They found this in Fremantle and were reluctant to leave. When the Commanding Officer of Australia ordered his men to take the ship to sea the stokers refused and walked out of the stokehold and engine room. As a result five men considered to be the ringleaders were court martialled and when found guilty sentenced to varying periods of imprisonment at Goulburn Gaol.

This caused an outcry among the Australian population because of the supposed harshness of the sentences. The men were later released, but not before the matter had reached the level where the Prime Minister had to step in to prevent the First Naval Member (Rear Admiral Dumeresq RN) from resigning as he saw Naval discipline being eroded by public opinion.

In June 1920 the cruiser was involved in the activities connected with the visit to Australia of the Prince of Wales who was travelling in the British battleship HMS Renown. On 30 September 1920, Encounter paid off into Reserve in Sydney. Among her many long serving crew who left the ship on that date was her Canteen Manager, Victor Zammit, who had joined the ship as a Canteen Assistant in early 1914. He had spent six years in the ship providing canteen supplies to her men. There was little refrigeration space onboard Encounter and her crew were often forced to subsist on tinned salmon and salted meat. As a result the canteen was well patronised.

Although technically civilians the Canteen Manager and his assistants were classified as members of the crew and played an integral part in the running of the ship. Victor Zammit went on to serve in a variety of Australian warships until he eventually retired in the late 1940’s.

In early 1921 it was proposed to use Encounter as a depot ship, at Geelong, for the six J Class submarines, however, HMAS Platypus was chosen for this role instead. This is not surprising as she was specifically built as a submarine depot ship for the E class submarines AE1 and AE2. Throughout 1921-22 Encounter remained in Sydney with other ships of the Reserve Fleet tied up alongside her. A small care and maintenance party was responsible for looking after these ships and basically ensuring that the ships did not sink!

Encounter’s resurrection began in late 1922 when the Naval Board decided that she would become the new Sydney depot and receiving ship. She would replace the elderly HMAS Penguin that was an old barque rigged composite screw sloop in use by the RN from 1877 until 1907. In 1908, Penguin had her masts removed and was roofed over to become the RN depot ship in Sydney. In 1913 she was transferred to the RAN to carry out the same task. By 1922 Penguin was in a poor condition and needed to be replaced.

On 1 January 1923 the former cruiser Encounter was commissioned as HMAS Penguin. In preparation for this role her armament had been removed and her normal appearance was also altered by being painted white overall with buff funnels. She thus became the floating home for Naval personnel working at Garden Island and for crews who ships were in refit.

She continued in this role until 15 August 1929 when she was decommissioned and replaced at the depot ship by Platypus. Platypus was renamed Penguin and remained as the depot ship until February 1941 when she was renamed Platypus and sent north to Darwin as the depot ship. Platypus later saw service in New Guinea waters later in World War II.

The former Encounter was then towed to Cockatoo Island Dockyard where throughout 1930-31 she was stripped of all usable fittings. On 14 September 1932 (which was the 18th Anniversary of her shelling of Toma Ridge in German New Guinea) Encounter’s hulk was towed out through Sydney Heads on its way to be scuttled some five miles north east of South Head. The old cruisers sea cocks were opened and a scuttling charge lit, however the charge failed to explode and as a result the ship drifted south and eventually sank, stern first, some five miles south east of the South Head Signal Station. One old salt was heard to remark that the ship had died hard and ‘was trying to make harbour just one more time‘.

The ‘Old Bus‘ was gone and while her wartime record was mediocre when compared to her younger sisters she still played a vital role in defence of the eastern coast of Australia, and the anti raider patrols in the South West Pacific. There were some that claimed she failed to live up to her name of Encounter, as she had not encountered KOMET and CORMORAN in 1914 or WOLF in 1917. However, with all battles at sea there is always one element of luck – that is actually finding the enemy in the first place. As the training cruiser she was also for many young Australian sailors their first ship and her epitaph belongs to one of them:

When on 14 September 1932, the shell of HMAS Encounter was sunk outside Sydney Heads, the Royal Australian Navy lost a ship which played a great part in implanting in our sailors the traditions of the Royal Navy. Most of the present personnel of the Royal Australian Navy received their first sea training in her, and she was more beloved than any other unit of our fleet.


HMS ENCOUNTER

Casualties 5 January 1909

  • Ordinary Seaman Archibald David BALCOMB aged 19
  • Ordinary Seaman Percy Thomas BARRETT aged 19
  • Ordinary Seaman Frank Arthur BRISTOWE aged 19
  • Stoker 1st Class William CUNNINGHAM aged 22
  • Stoker 1st Class Arthur George DONN aged 23
  • Ordinary Seaman William Henry EVANS aged 18
  • Ordinary Seaman Alexander GIRLING aged 19
  • Plumber’s Mate Frank GREGORY aged 19
  • Ordinary Seaman Albert John HILL aged 20
  • Ordinary Seaman Edwin James HORNSBY aged 19
  • Stoker 1st Class Herbert H. HUMBERSTONE aged 24
  • Ordinary Seaman Ernest George MARSH aged 19
  • Able Seaman Joseph William OUTTEN aged 22
  • Stoker 1st Class Frank SEARLE aged 22
  • Ordinary Seaman David STRELITZ aged 21

The names of these fifteen men are recorded on a memorial at the Naval Section Rookwood Cemetery, Sydney.

The memorial has the following inscription:

In Memoriam – Fifteen men of the Royal Navy serving in HMS Encounter who were drowned in Sydney Harbour on 5 January 1909. Their names and ratings are recorded on the other sides of this monument which has been erected by their officers and ships company, assisted by the officers and men of other HM Ships on the Australia Station, and many sympathetic friends among the general public of this state.


COMMANDING OFFICERS

HMAS ENCOUNTER/PENGUIN 1912-1929

HMAS ENCOUNTER 1912-23

  • Captain B M Chambers RN 1 July 1912 – 12 March 1913
  • Captain A G Smith RN 13 March 1913 – 27 January 1914
  • Captain C La P Lewin RN 28 January 1914 – 23 January 1916
  • Captain C Cumberlege RN 24 January 1916 – 30 October 1916
  • Captain J B Stevenson RN 31 October 1916 – 22 November 1918
  • Captain W H C S Thring RAN 23 November 1918 – 11 February 1919
  • Captain J F Robins RAN 12 February 1919 – 30 September 1920
  • Reduced to Care and Maintenance Party at Sydney on 30 September 1920 with either an Engineer Lieutenant or Shipwright Boatswain in command.

HMAS PENGUIN 1923-29

  • Captain A G Crauford RN 9 March 1923 – 31 March 1925
  • Captain J F Robins RAN 1 April 1925 – 30 September 1927
  • Captain H P Cayley RAN 1 October 1927 – 15 August 1929


HMAS ENCOUNTER

World War I Casualties (1914-21)

  • ERA 1st Class Robert BANKS Official Number 7693. Died of Heart Disease 27 February 1915 and buried in Suva, Fiji.
  • ERA 3rd Class Alfred Lachlan BIRD Official Number 3542. Died of Pneumonia 7 May 1919 and buried at Rookwood Cemetery.
  • Master At Arms William CHALMERS Official Number 5202. Died as a result of suicide and buried at Rookwood Cemetery Sydney. Drafted from Encounter to Penguin one week before his death.
  • Armourer’s Crew Charles Henry Foster GARDNER Official Number 2673. Died of Meningitis while on loan to the Australian Naval and Military Expeditionary Force (ANMEF) 22 December 1914. Buried at Bita Paka Cemetery Rabaul, Papua New Guinea.
  • Warrant Mechanician Gerald HOLMES (Previously Mechanician with Official Number 7422). Invalided from the service on 26 November 1919 and died as an inmate at Callan Park Asylum (Insane Asylum) on 19 February 1920. Cause of death considered war related. Buried at Rookwood Cemetery (Grave no longer visible)
  • Stoker George Edward HOWES Official Number 3351. Died of Tuberculosis 12 June 1915. Buried in Naval Plot at Rookwood Cemetery Sydney.
  • Petty Officer John Charles JOPE Official Number 2456 (on loan from Royal Navy). Died following an operation on 29 February 1916. Buried at Albany Western Australia.
  • Leading Seaman Ernest John William McMILLAN Official Number 2570. Died from drowning 3 August 1921. Buried in the Naval Plot at Rookwood Cemetery Sydney.

Note: Able Seaman David GAFF, Official Number 2017 is incorrectly listed by the Australian War Memorial as an Encounter casualty. Gaff served in Encounter from 21 May 1913 until 31 December 1917. He was then posted to Cerberus for a month and then to the London Depot. Gaff was attached to the London Depot while in transit to join one of the Australian Torpedo Boat Destroyers, then operating in the Adriatic and based at Brindisi, Italy. He died en route and is buried in the St Germain Churchyard Cemetery near Lyon in France. It is believed he was still wearing his HMAS Encounter cap tally at the time of his death and thus was incorrectly listed as still serving in that ship by the Commonwealth War Graves Commission (CWGC). His headstone at St Germain has been corrected by the CWGC to reflect his unit as the Royal Australian Navy and not HMAS Encounter.

The Australian War Memorial is yet to correct this anomaly.


HMAS ENCOUNTER

Challenger Class Light Cruiser


1905 – 1932
(Originally a Second Class Protected Cruiser)

  • Displacement: 5880 Tons (6018 Metric Tonnes)
  • Length: 376 Feet Overall (114.6 Metres)
  • Beam: 56 Feet (17.06 Metres)
  • Draught: 20.8 Feet
  • Speed: 21 Knots (Sustained cruising speed of 10 Knots)
  • Complement: 475 Officers and Men
  • Cost: 420,000 Pounds
  • Machinery: Two Keyham 4 Cylinder triple expansion steam engines developing 10,000 Shaft Horse Power (SHP) or 12,500 IHP; 12 Durr Boilers; twin screws.
  • Coal Capacity: 1,225 Tons (1,250 Metric Tonnes)
  • Armament:
    • 11 x 6 inch (15.2 cm) Breech Loading Guns
    • 9 x 12 Pounder Quick Firing Guns (later reduced to four)
    • 6 x 3 Pounder Quick Firing Guns
    • 3 Machine Guns
    • 2 x 18 inch submerged Torpedo Tubes

Bibliography

Alexander R The Raider Wolf, Angus and Robertson, Melbourne 1968.

Bach J The Australia Station – A history of the Royal Navy in the South West Pacific 1821 -1913, NSW University Press, 1986.

Bastock J Ships on the Australia Station, Child and Associates – Australia 1988.

Bromby R German Raiders of the South Seas, Doubleday Australia, Sydney 1985.

Cassells V The Capital Ships – Their Battles and their Badges, Kangaroo Press, Roseville Sydney, 2000.

Daw C E / Lind L J HMAS SYDNEY 1913-1929, Naval Historical Society of Australia, Sydney, 1973.

Eldridge F B A History of the Royal Australian Naval College, Georgian House, Melbourne 1949.

Fowler H M The Log of HMS Encounter – Australia Station 1908-10, Westminster Press, London 1910. (Note H M Fowler was a member of the ships Royal Marine detachment. A copy of this book is held in the ADFA Library under DU112.4 F6 1910)

Gillett R Australian and New Zealand Warships 1914-45, Doubleday Australia, Sydney, 1983.

Gillett R Warships of Australia, Rigby Limited Australia, 1977.

Jose A W The Royal Australian Navy (The Official History of Australia in the War of 1914-18, Volume IX), University of Queensland Press 1987.

Lind L J Fair Winds to Australia – 200 years of sail on the Australia Station, Reed Books Pty Ltd, Sydney, 1988.

Lind L J HMAS PARRAMATTA 1910-1928, Naval Historical Society of Australia, Sydney, 1974.

MacKenzie S S The Australians at Rabaul (The Official History of Australia in the War of 1914-18, Volume X), University of Queensland Press 1987.

Odgers G The Royal Australian Navy – An Illustrated History,

Thomas L The Sea Devil – The Story of Count Felix Von Luckner the German War Raider, William Heinemann Ltd 1937.

Wilson H W The Log of HMS Encounter – Australia Station 1910-12, Westminster Press, London, 1912. (Note H W Wilson was a Petty Officer in HMS Encounter. A copy of this book is held in the ADFA Library under DU 112.4 W5 E5 1912).

Naval Historical Society of Australia Reviews – June 1974, June 1977, September 1979, June 1981, December 1981, February/March 1984, April 2001

Navy List 1913-1929, Government Printer Melbourne.


HMS ENCOUNTER


Royal Navy Destroyer (1934 – 1942)
The Royal Navy destroyer HMS Encounter was sunk on 1 March 1942, in the Java Sea near Southern Borneo, by a force of five Japanese warships (consisting of cruisers and destroyers). Her Commanding Officer (Lieutenant Commander E V St J Morgan DSC, RN) five other officers and 143 ratings survived the sinking and were made Prisoners of War.

Encounter was built in 1934 and was sister ship to HM Ships Express and Electra. Electra was also sunk in the Java Sea on 27 February 1942.

These destroyers displaced 1375 Tons and had an armament of 4 x 4.7 inch guns and 4 x 21 inch torpedo tubes. They could steam at 36 knots.


HMAS ENCOUNTER

Naval Depot South Australia (1965 – 1994)
(Originally by John R Sullivan from the SA Chapter of the Naval Historical Society)

On 12 April 1915, the Commonwealth acquired land for the purposes of establishing a new naval depot in South Australia, to replace the existing depot at Largs Bay. The new depot was to be at Birkenhead, in the Municipality of Port Adelaide, and it had a number of advantages in that it was close to the port river and adjacent to ship repair facilities. Between the two World Wars the Birkenhead Naval Depot gradually grew as additional land was acquired. An ongoing feature at the depot was Naval Reserve training.

When World War II began the depot was officially commissioned as HMAS Cerberus IV on 13 September 1939. On 1 August 1940 the dept was recommissioned as HMAS Torrens. On 12 August 1941 two sailors from Torrens were killed when a mine, which they were defusing on the shore at Beachport (between Robe and Mt Gambier), detonated. It is believed these were the first naval personnel killed on Australian soil during World War II as a result of enemy action.

After the war Torrens returned to its peacetime roles of providing a naval presence in South Australia, assisting visiting ships and conducting reserve training. On 1 March 1965 the depot underwent another name change and was recommissioned as HMAS Encounter. This name perpetuated the former light cruiser, built for the Royal Navy in 1905-06. Her first commission was on the Australia Station and when the RAN was formed Encounter was loaned by the RN to the fledgling navy. She was commissioned as HMAS Encounter and later formally transferred to the RAN.

The name Encounter also commemorates the meeting between Mathew Flinders and the French explorer Nicholas Baudin off the South Australian coast in April 1802. Encounter’s crest perpetuates this meeting as it comprises the French and British Flags.

On 21 March 1994, HMAS Encounter was decommissioned and this marked the end of over 100 years of a permanent naval presence in the Port Adelaide area. The last Commanding Officer, Commander Brian Gorringe ADC, RAN officiated at the decommissioning ceremony, after which the White Ensign was lowered for the last time. The Ensign, which had been autographed by many of Encounter’s last ships company, was presented to Ms Diewuke Jessop, Acting Director of the South Australian Maritime Museum. Commander Gorringe retained the ships Commissioning Pennant.

The RANR Band then led the ships company from the grounds of the former HMAS Encounter out onto the adjacent roadway where they halted and dismissed. The Commanding Officer was at the rear of the march, in maintenance of the maritime tradition that the Captain is the last to leave the ship.

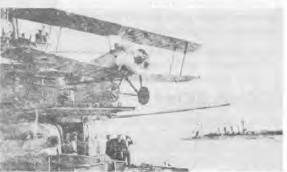
Book Review: The Forgotten Cruiser HMAS Melbourne 1913-1928

August 24, 2013

The Forgotten Cruiser HMAS Melbourne 1913-1928 By Andrew Kilsby and Greg Swinden, Longueville Media, Woollahra, NSW, 2013. Available from cooeehistory.com RRP $49.95.

On 26 March 1913, HMAS Melbourne, Australia’s first light armoured ‘Chatham Class’ cruiser, commissioned at Birkenhead on 18 January 1913 and laid alongside Port Melbourne’s Town Pier on completion of her maiden voyage. On 4 October 1913, Melbourne, along with HMA Ships Australia, Sydney, and the other modern and capable standard bearers of the Royal Australian Navy (RAN), entered Sydney Harbour as part of the inaugural RAN Fleet Review.

Less than a year later the nation was at war and Melbourne deployed as part of the joint force to seize German territories to Australia’s north and as the RAN’s formidable sword and shield against the powerful German East Asiatic Naval Squadron. On 8 November 1914 Melbourne assumed command of the Australian-New Zealand 36 ship convoy, her sister ship Sydney and the Japanese battle cruiser Ibuki on the day before the historic Sydney-Emden engagement off the Keeling Islands Group in the Indian Ocean.

This belated and welcome book is about much more than a pioneer warship, it is about people – the crews who sailed in her from her commissioning in 1913 until she was finally ‘paid off’ in 1928.

An engaging and compelling feature of the narrative is the effective use of a range of material to describe the daily lives and personal circumstances of the many individuals who comprised the crews of Melbourne, as she moves from times of peace to war to peace, across the seas of contrast, from the extremes of weather and sea states, through the vagaries and complexities of challenging operational conditions, to the rare opportunities of life ashore and the occasional ‘pomp and circumstance’.

Officers and men come alive on the page, whether in the course of grinding routine or exceptional duty, at times of achievement, or during the frank accounts of crime and punishment, of desertion, to the previously unsung heroes, exemplars, and ‘everyman’, to the stimuli of reinforcement and relief, to the never ending cycle of duty, refurbishment and training and response to new technology such as the aircraft, the submarine and the mine.

The reader is thoughtfully introduced by way of continuing emphasis throughout the book to the realities for the individual of naval life and service, to the ‘wear and tear’ of constant alertness to the proximity of death in many guises, to matters of leadership at every level, to discipline, to death or injury by enemy action, or accident, or illness, or sea conditions, to the belated ‘war deaths’, and the comparisons and contrasts between peace and war service. In all these diverse circumstances the ship and the crew are one, totally dependent for their survival and health on the actions and capacities of each other sealed within a cocoon of mutual interdependence.

Yet as the authors vividly reveal, chance is a fickle companion. Whether as evident in the decision by the Captain of the Melbourne to protect the Australian/New Zealand convoy or pass the honour and glory to Sydney, or the 40 ft. near miss by a German torpedo in the English Channel en route to Plymouth there to have the first leave since the war began, to the other near misses as seen in the fate of other ships, or a member of the RN’s ‘Suicide Squadron’ on convoy duty in the North Sea.

The Forgotten Cruiser is an Aladdin’s Cave, filled as it is with enchanting images of colourful and stimulating graphics of diverse intent; a copy of the SECRET Sailing Orders of 2 September 1914, a reminder that boys served on Melbourne with a copy of a coloured diagram illustrating the correct layout of ‘1st and 2nd Class Boys Kit’, a copy of the SOS that led to the extraordinary rescue, under the most extreme of conditions, of the 18 crew and passengers of the sinking schooner Helen B Sterling, the careful placement of long hidden records and photographs of men, ship and events, the detailed nominal roll of the original commissioning crew in 1913, and finally the comprehensive and enlightening bibliography, footnoting and informative captions.

Congratulations to Andrew Kilsby and Greg Swinden for bringing this treasure chest onto public display and on the quality of the detailed research and technical command of their subject. Alistair MacLean, as author of HMS Ulysses, would say ‘welcome aboard’.

Reviewed by: Dr Jim Wood


The Career of Vice Admiral Mortimer L’Estrange Silver, CBE, RN.

March 3, 2012

By Midshipman D.M. Greenwood, RAN

 Damian Greenwood was born in Hong Kong. After completing high school at Forbes in NSW he attended the University of Hong Kong where he gained a Masters degree in Social Sciences majoring in Criminology. A keen historian and medal collector, he is a long-time member of both the Australian National Maritime Museum and the Orders & Medals Research Society, serving as the Honorary Secretary of the Hong Kong Branch from 2002-2008. He lives in Sydney with his partner and their three-year-old son. He joined the RAN in January 2011 and is training to become a Maritime Warfare Officer.

Thus one advances without seeking glory, retreats without avoiding blame, only protecting people…thus rendering valuable service to the nation.

Sun Tzu[1]

INTRODUCTION

By the evening of 9 November 1914, the German cruiser SMS Emden (Captain Helmuth von Muller) lay as a smouldering wreck, beached on North Keeling Island to prevent her from sinking. Her nemesis HMAS Sydney (Captain John Glossop, RAN) skulked in the dusky horizon. Sydney had just scored Australia’s first significant naval victory and brought to an end the amazing career of a warship that had in four months sunk or captured 28 Allied ships, sunk a Russian cruiser and a French destroyer, raided Penang Harbour and had single-handedly bombarded Madras. Emden had become a legend in its own time and the destruction of such a legendary ship in turn gave worldwide fame to Sydney, her captain and the RAN, then one of the world’s newest navies.

Meanwhile, in the background, out of the news, was CAPT Mortimer L’Estrange Silver, RN. On that fateful day in November 1914, Silver was in command of HMAS Melbourne and commander of the 38-ship convoy transporting the first ANZAC troops across the Indian Ocean. Had circumstances been slightly different, Silver and Melbourne would have taken their place in history instead of Glossop and Sydney. It was Silver who gave the order for Sydney to destroy Emden, denying him the action and excitement absent for almost all of his thirty years in naval service.

In this essay we will review Silver’s career and the events leading up to the victory over Emden. We will analyse his actions and what positive attributes can be learned from them to benefit today’s RAN.

SILVER’S EARLY LIFE AND CAREER

Mortimer Silver was born in 1869, the son of Jacob Mortimer Weir Silver, a Colonel in the Royal Marine Light Infantry and later an Anglican priest serving in Hawaii and France, and his wife Annette Louisa Graves. His paternal grandparents were Jacob Silver, a Captain in the Royal Navy, and Charlotte Masters.

Silver entered the Royal Navy as a Midshipman on 15 July 1882. In 1891 he was posted aboard HMY Victoria and Albert, the Royal Yacht based at Portsmouth, and promoted to Lieutenant on 1 September of the same year. On 30 September 1894, Silver qualified as a Torpedo Lieutenant and was posted to HMS Vernon, a Torpedo School Ship at Portsmouth. He was appointed to his first command on 6 October 1902 as captain of the 810 ton Torpedo Gunboat HMS Jaseur, a tender to Vernon. On 31 December 1902 he was promoted Commander and transferred to the battleship HMS Temeraire, depot ship of the Fleet Reserve and Flagship at Devonport. On 2 June 1903 he was posted as Executive Officer aboard the 14,000-ton battleship HMS Exmouth in the Mediterranean. He then served on three further battleships, HM Ships Prince of Wales, Revenge and Britannia. On 13 August 1907 he was again given a command, this time of Torpedo School Ship HMS Actaeon which formed the new Torpedo School at Sheerness. Promoted to Captain on 30 June 1908, he was in command of the 4th Destroyer Squadron from 5 August 1910 to 1 August 1912.

SILVER BEGINS HIS SERVICE TO AUSTRALIA

In August 1912, his career took a new turn when he was loaned for duty with the Australian Government to help develop the fledgling RAN. It was formally announced on 7 August 1912 that he would be in command of the new cruiser Melbourne and that he “…has an excellent record of service in the Royal Navy”[2]. The Australian Navy List from 1 July 1914 shows Silver as sixth in Navy military branch hierarchy[3] and the most senior sea-going Captain.

Pages: Page 1 Page 2 Page 3 Page 4
  • Go to page 1
  • Go to page 2
  • Go to page 3
  • Interim pages omitted …
  • Go to page 13
  • Go to Next Page »

Primary Sidebar

SUBSCRIBE

Sign up for our monthly e-newsletter.
  • This field is for validation purposes and should be left unchanged.

Categories

Latest Podcasts

  • First Victory, Musical Composition by Petty Officer Musician Martyn Hancock
  • AE2 – Stoker’s Submarine, Musical Composition by Lieutenant Matthew Klohs RAN.
  • AE1 – The Ship without a Name, Musical Composition by Lieutenant Matthew Klohs RAN.
  • The Loss of HMAS Armidale by Dr Kevin Smith
  • D-Day commando on Sword Beach by Commander Jim Speed DSC, RAN

Links to other podcasts

Australian Naval History Podcasts
This podcast series examines Australia’s Naval history, featuring a variety of naval history experts from the Naval Studies Group and elsewhere.
Produced by the Naval Studies Group in conjunction with the Submarine Institute of Australia, the Australian Naval Institute, Naval Historical Society and the RAN Seapower Centre

Life on the Line Podcasts
Life on the Line tracks down Australian war veterans and records their stories.
These recordings can be accessed through Apple iTunes or for Android users, Stitcher.

Video Links

  • Australian War Memorial YouTube channel
  • Royal Australian Navy YouTube Channel
  • Research – We can help!
  • Naval Heritage Sites
  • Dockyard Heritage Tour
  • About us
  • Shop
  • Events
  • Members Area
  • Volunteer
  • Donate
  • Contact us

Facebook

  • Members Area
  • Privacy Policy
  • Log Out

Naval Historical Society of Australia Inc. Copyright © 2021